WordPress Multisite Tutorial: Multiple Blogs on a Single Installation
One of the most fascinating WordPress features is its multisite functionality. While in the past multiple WordPress websites required multiple installations, today you only need one with multisite. All it needs are multiple websites that use either subdomains or subdirectories of one domain. If you have different domains, you can't use the WordPress network function without further ado - you'll need an additional plugin. This article shows how easy it is to create multisites and configure them perfectly.
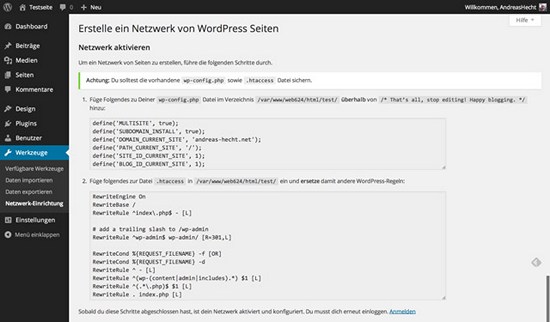
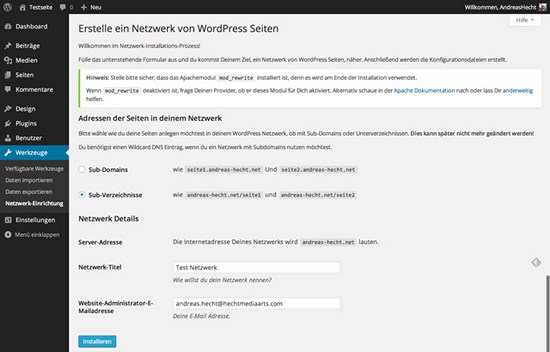 So, after you have decided to go for subdirectories and clicked "Install", you'll have to activate your network. For this, WordPress provides a code snippet in the next window that needs to be added to the wp-config.php and the .htaccess file.
 Note: Don't forget to make a backup before you start editing the files.
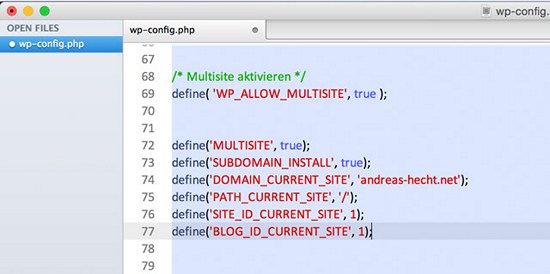
The upper part of the code is intended for the wp-config.php.
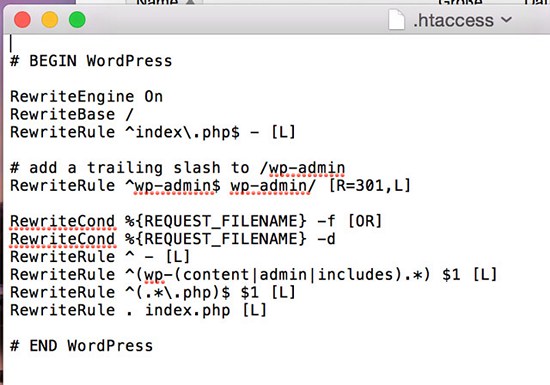
 The second part of the code replaces the WordPress rules in the .htaccess file. Add this snippet between BEGIN WordPress and END WordPress.
 The next step is a re-login. A link can be found at the bottom of the WordPress page with the code.
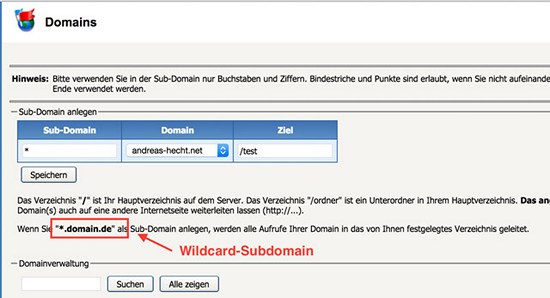 The Sub-Domain field only requires a "*", define the correct folder (target) on the server, and click Save. That's it. All of your defined new websites in the network can now be called.
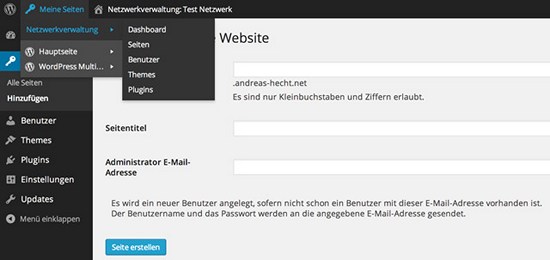 Now, let's create a new website. Go to the Network Admin and select Sites => Add New. Enter your preferred subdomain if you have chosen subdomains. Otherwise, enter the name of your preferred subdirectory.
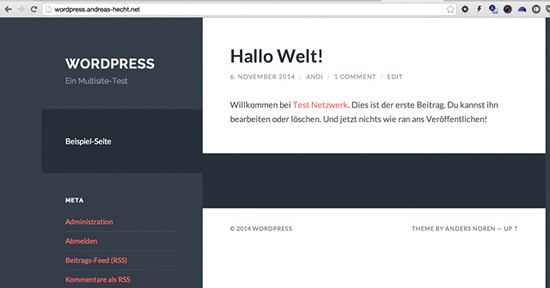
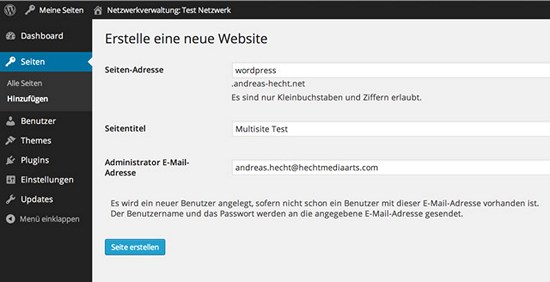 You can also define a new administrator for the relevant website by changing the administrator's email address. The login data are then sent to the provided email address. After clicking Add New, you can call your new website. At My Sites, you can switch to the relevant site and create new articles and pages as usual. The site I've created in the example is called WordPress (wordpress.andreas-hecht.net). By the way, you can create as many (web) pages as you like.
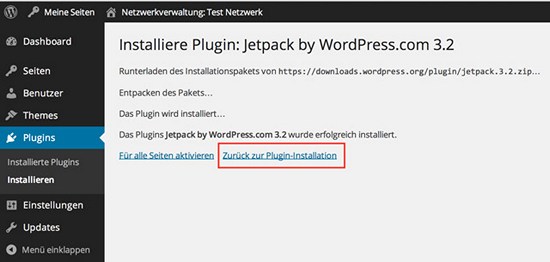 Don't activate plugins for all sites!
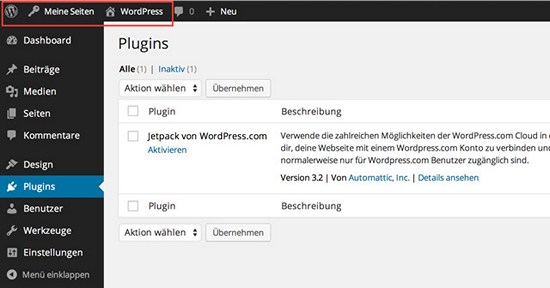 Now the plugin can be activated in the respective WordPress multisite website.


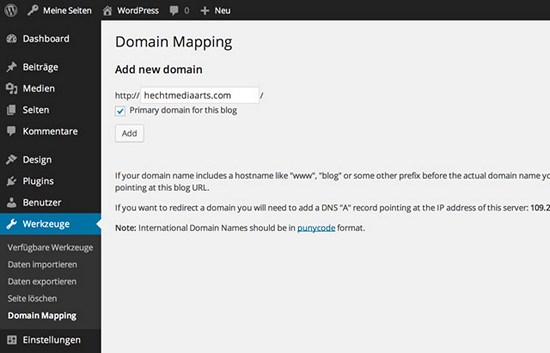 Set the primary domain in the following window under which you want your WordPress multisite to be called. In my example I will use hechtmediaarts.com instead of wordpress.andreas-hecht.net.
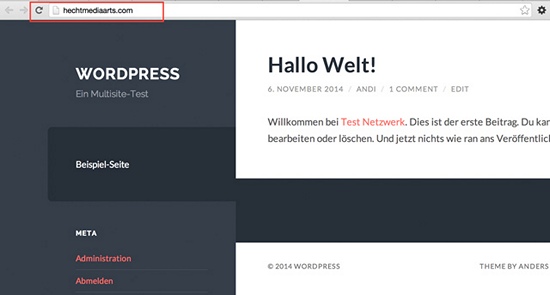
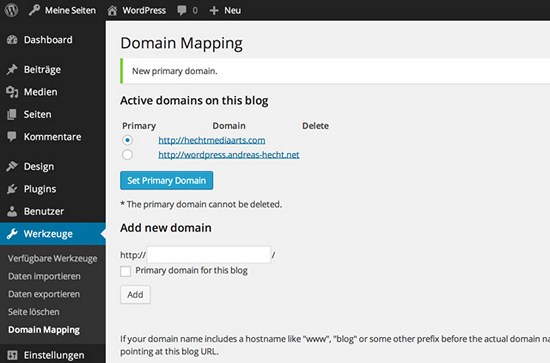 The last step is to choose the new primary domain. Now your multisite website has a new domain. You might get thrown out from the admin section but don't worry - that's normal. Just log in again.

1. What Is a Multisite and How Does It Work?
A multisite summarizes multiple WordPress installations to only one, provided that you use subdomains or subdirectories. To show you what I mean:- A subdomain looks like this: wordpress.noupe.com
- A subdirectory, however, would look like this: noupe.com/wordpress
2. Subdomains or Subdirectories - What Should I Choose?
First of all, this is a personal decision. Choose the one you feel most comfortable with. There is, however, a significant difference in how Google handles and allocates page ranks. Subdomains are ranked as independent websites whereas subdirectories are part of a website, and the page rank is, therefore, allocated to the primary site. Subdirectories are also better for the link power of the primary site. On the other hand, subdomains have the advantage that more results can be displayed for a search query. Usually, a maximum of 2 pages of search results are displayed per domain. According to Matt Cutts this limit can be abolished with subdomains. In terms of ranking, subdomains and subdirectories have the same behavior.3. Setting up a Multisite
The setup of a multisite is a breeze. Just follow this tutorial step by step and you can't go wrong.Tell WordPress You Want to Set up a Multisite
Paste the following code into the wp-config.php of your WordPress installation:/* Activate Multisite */ define( 'WP_ALLOW_MULTISITE', true );
Setting up the Multisite Network
After you've uploaded the tweaked wp-config.php back into the WordPress directory, go to Tools, and you'll see a new menu item called Network Setup. Now you can decide whether you want the new sites to be accessed via subdomains or subdirectories. Choose wisely as you can't reverse that decision later on. This menu item allows you also to entitle the network of websites and define the administrator's email address. These settings can be changed later on. Let's assume that you have chosen subdirectories in this example. So, after you have decided to go for subdirectories and clicked "Install", you'll have to activate your network. For this, WordPress provides a code snippet in the next window that needs to be added to the wp-config.php and the .htaccess file.
 Note: Don't forget to make a backup before you start editing the files.
The upper part of the code is intended for the wp-config.php.
 The second part of the code replaces the WordPress rules in the .htaccess file. Add this snippet between BEGIN WordPress and END WordPress.
 The next step is a re-login. A link can be found at the bottom of the WordPress page with the code.
Preparation for Networks with Subdomains - Creating a Wildcard Domain
If you've decided to use subdomains for your WordPress multisite network, you'll have to set up a so-called wildcard subdomain. The wildcard subdomain then creates new websites (with a new subdomain) in the WordPress backend that can be used immediately. A new subdomain maps directly to the right place. That's how WordPress works. There you can create a new blog, also with a subdomain. WordPress shows what this multisite functionality can do. A wildcard domain looks like this: *.yourdomain.com. Unfortunately, I can't give you general instructions here on how to configure a wildcard domain as the approach differs from host to host. My host, Alfahosting, provides me the administration interface Confixx to administrate my hosting package. Here the wildcard is created this way: The Sub-Domain field only requires a "*", define the correct folder (target) on the server, and click Save. That's it. All of your defined new websites in the network can now be called.
Networks with Subdirectories
If you have decided to use subdirectories rather than subdomains to name the websites in the network, you're finished now and can start creating new (web)pages in the network. Creating New Websites in the Multisite Network After the re-login into the WordPress admin interface, you'll find the new menu item My Sites in the top-left corner. My Sites => Network Admin is your control center where you can create new websites, install and activate plugins and themes, add new users, etc. Now, let's create a new website. Go to the Network Admin and select Sites => Add New. Enter your preferred subdomain if you have chosen subdomains. Otherwise, enter the name of your preferred subdirectory.
 You can also define a new administrator for the relevant website by changing the administrator's email address. The login data are then sent to the provided email address. After clicking Add New, you can call your new website. At My Sites, you can switch to the relevant site and create new articles and pages as usual. The site I've created in the example is called WordPress (wordpress.andreas-hecht.net). By the way, you can create as many (web) pages as you like.

4. Handling Themes and Plugins
Themes and plugins are installed via the Network Admin. Themes need to be "network enabled" to appear in the menu item Design => Themes of the respective website where you can activate them. As each website created in the network administration is treated as an independent installation by WordPress, you can also define and activate different themes and plugins for each website. But caution: While themes always work, some plugins struggle with a multisite and don't work. Thus, after installing the plugin you should always check whether it works on all network websites. In my experiences with the WordPress multisite function, plugins should only be uploaded and installed in the network administration but not activated. Then they'll appear in the plugin overview of each multisite website and can be there activated and configured. If you activate them at the highest level, they won't appear in the plugin lists of the multi websites and can't be individually configured. Don't activate plugins for all sites!
 Now the plugin can be activated in the respective WordPress multisite website.
5. Is it Not Possible to Operate a Multisite with Independent Domains?
It is; however, not without the help of a plugin. You'll need the WordPress MU Domain Mapping for this.
- Developer: Donncha O Caoimh, Automattic
- Continuous development: Yes
- Lates version: 04/17/2014
- Price: Free on WordPress.org
- License: GNU GENERAL PUBLIC LICENSE
- Incompatibility with other plugins: Not known
- Developer's homepage: None
define( 'SUNRISE', 'on' );
Configure the New Domain
First of all, configure your preferred domain for the use with your multisite website. I can't explain this in detail as the process differs from hoster to hoster. I'll show you, though, how easy it is with my hoster Alfahosting. I log into my webhosting configuration Confixx and set my preferred domain to map to the folder on the server where the WordPress installation is located. If your WordPress installation is located in the server folder www/html/wordpress, the new domain needs to map to this folder. The new domain then has the same target like your main domain under which the network is accessible. You only have to set up a domain redirection. Now, log into the WordPress administration of the website which will get the new domain. Add your preferred domain under Tools => Domain Mapping. Set the primary domain in the following window under which you want your WordPress multisite to be called. In my example I will use hechtmediaarts.com instead of wordpress.andreas-hecht.net.
 The last step is to choose the new primary domain. Now your multisite website has a new domain. You might get thrown out from the admin section but don't worry - that's normal. Just log in again.

Conclusion
With the right background knowledge setting up a multisite installation is a breeze, especially if you use subdirectories. It takes only a few more minutes to set up a subdomain and there's even a practical and somewhat comfortable solution for independent domains. So, get started with the administration of multiple WordPress sites using only one administration interface.Related Links
- Matt Cutts about Subdomains and Subdirectories
- WordPress Codex on Multisite: Create a Network
- WordPress Codex on Wildcard Domains: Configuring Wildcard Subdomains
- WordPress Codex on Multisite Administration: Multisite Network Administration
- WordPress Plugin: WordPress MU Domain Mapping from WordPress.org

I am using multisite to provision blogs for users that register. Something similar to the hosted wp version. It’s pretty nice to work with, and a perfect solution for keeping your websites under control from a single admin :-)
It is, without any plugins, you can just change address of site in the subdomain install and it works…
I’m currently trying to update my single WordPress install to a Multisite install but have run into some trouble. It should be noted that you will not always have the option to choose sub-domain or sub-directory during the initial process of creating your network. The Codex states:
“If you have had WordPress installed for longer than a month and are attempting to activate the network, you will be told to use Sub-domain sites.”
You can read more about how to choose sub-directory over sub-domain for an established installation here:
http://codex.wordpress.org/Multisite_Network_Administration#Switching_network_types
Hi,
I want only registered users can view some sections of my blog e.g premium tools, how do I do it.
Regards
Tauseef
Hi Andreas,
Is the .htaccess the one in the main root (www) or is the one in the main directory of the multi-site? I have 3 multi-site wich has a directory in the main root and also have de htaccess with the code you have wrote, however the SEOcheckup doesn’t recognize.
I would like to be sure, if I’m in right or I must change my settings.