WordPress: This Checklist Helps you Optimise your Articles
Have you already published that blog post and just noticed that you forgot some important aspects? We all make mistakes when writing our articles. It happens a lot that you forget something and get angry at yourself for clicking "Publish" too early. Highly successful bloggers always use a checklist that contains the most important aspects for that exact reason. You can then simply go through the list, and will never forget anything again. Today, we will show you how you can easily create a checklist like this.
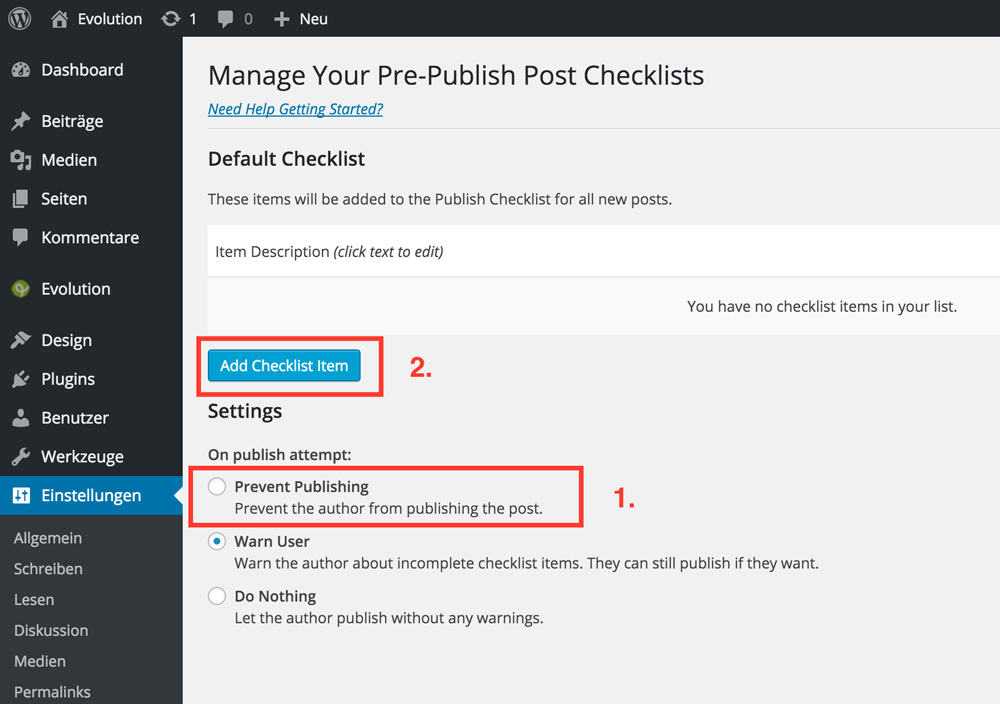 There you need to tick the item "Prevent Publishing". This setting prevents you from publishing (or scheduling) the article when there are still important things missing. Second, you click the button "Add Checklist Item". This allows you to enter the items on your checklist. Of course, you can also delete aspects from your list when you don't need them anymore. To do that, just click the "Remove" button on the right.
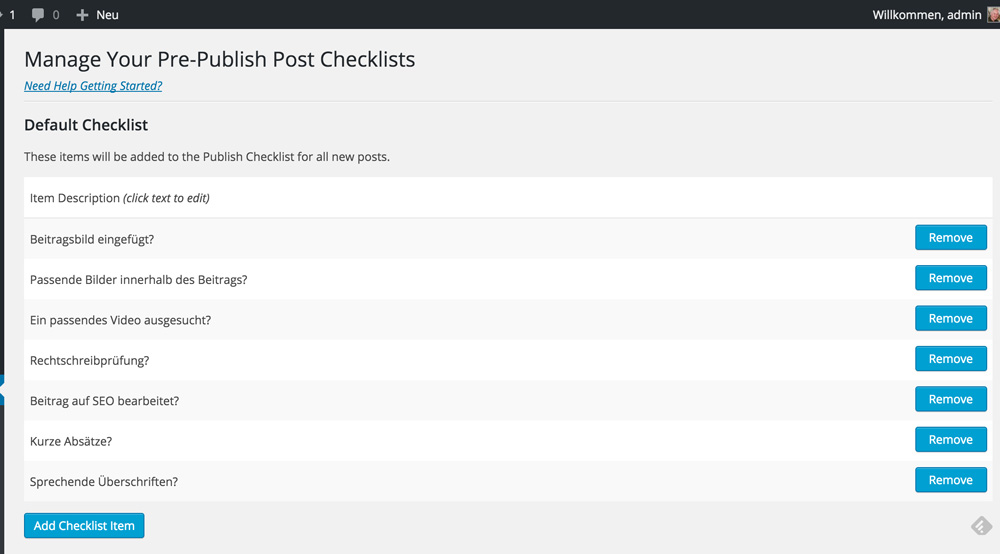 After adding the most important aspects to your list, you can finally use it. All you need to do now is write a new article.
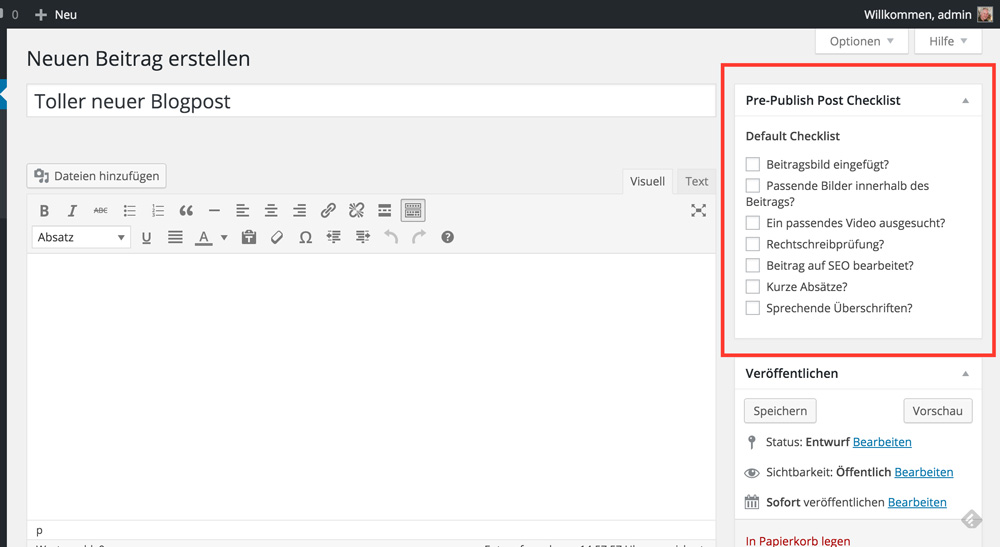 The widget boxes on the right side of your screen, next to the blog post editor, can be ordered via drag and drop, so move the box with your new list wherever you want it to be. A good idea would be having it right atop the others.
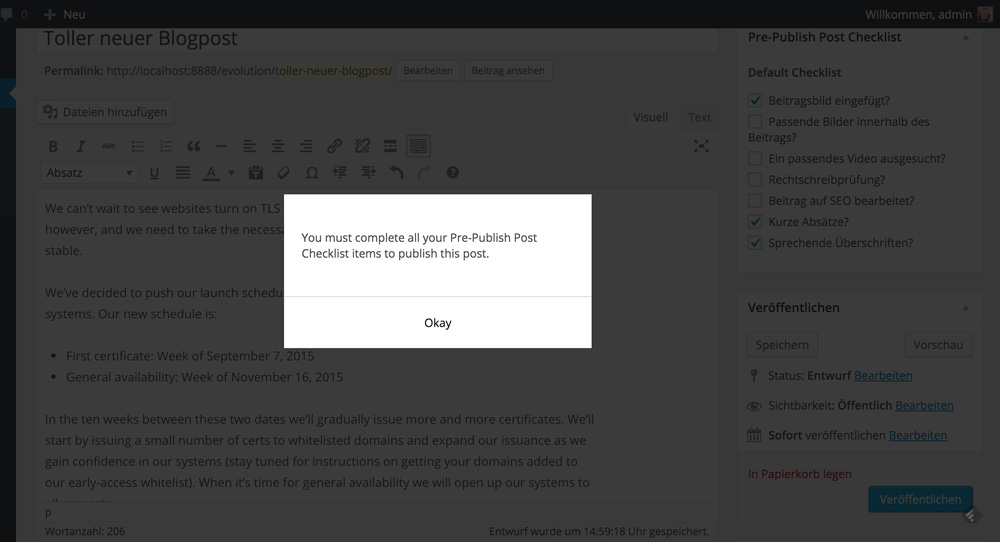 Every single aspect needs to be ticked before you can publish an article. This also works with scheduled pieces but not with drafts, obviously.
Why You Need a Checklist for Your Blog Posts
As a blogger, you have developed a particular process that you go through when constructing and publishing your articles. When you work in a team, like I do here at Noupe, you are lucky, as there is a chief editor that will look over your articles before they see the light of day. However, when you are working on your own, mistakes are made much more quickly. For example, articles without a featured or any post image at all go live, or you forget to check the spelling to prevent at least the most obvious mistakes. Another very popular mistake is publishing an article without optimising it for search engines aka Google. The bigger your project is, the more mistakes can be made. But it doesn't have to be like that. Think of how you usually make sure you achieve all the tasks you have to achieve. Don't you do that using a checklist? Also in WordPress we can have a list that helps you work more efficiently. Let's look at this list together.Creating an Article Checklist in WordPress
https://youtu.be/ziFn0Rq2tacThe »Pre-Publish Post Checklist« Plugin
First, you need the plugin »Pre-Publish Post Checklist«. You can download and install it the usual way from WordPress.org. Don't get scared off because the last update of the plugin happened a year ago. It still works on the latest WordPress version without any issues and should in the future as it does not add any exotic functionality. After installation and activation, you will see the following screen: There you need to tick the item "Prevent Publishing". This setting prevents you from publishing (or scheduling) the article when there are still important things missing. Second, you click the button "Add Checklist Item". This allows you to enter the items on your checklist. Of course, you can also delete aspects from your list when you don't need them anymore. To do that, just click the "Remove" button on the right.
 After adding the most important aspects to your list, you can finally use it. All you need to do now is write a new article.
 The widget boxes on the right side of your screen, next to the blog post editor, can be ordered via drag and drop, so move the box with your new list wherever you want it to be. A good idea would be having it right atop the others.
Working With the New Checklist
Using this checklist, you won't be able to forget anything ever again. By the way, the list can always be altered or extended when your requirements change. Simply write your articles just like you always do. Then, look at your checklist to see if you forgot something. When you try to publish the post without ticking all points on the list, you will quickly realise that it doesn't work. Every single aspect needs to be ticked before you can publish an article. This also works with scheduled pieces but not with drafts, obviously.

Great plugin, i’m going to try it for my articles! Many thanks!