Blog2Social for WordPress Boosts Your Social Media Strategy

Today marks the beginning of a small series, in which we'll present the best premium plugins for WordPress. Plugins that are worth spending money on, as they are much better, and much more useful than their free counterparts. We'll start with the social media plugin "Blog2Social" which has convinced me after an in-depth test.
All bloggers and website operators have one thing in common: they want to be found, and they want their content to be read. A very important part of a promotion strategy is posting the articles on the social media channels.
A plugin that takes care of these posts for you once an article was published can be helpful. There are many plugins that do that, such as Jetpack, for example.
However, using a plugin can also come with a bunch of disadvantages.

 On the Blog2Social „Settings“ page you can check the option to use the link-shortener and activate auto-posting by default (General). The “Best Time Settings” show pre-defined time windows suggesting best times to post. You can edit the suggested times and save them for the “My times” button on the “Custom Scheduling & Sharing” page. On the “Network Settings” you choose your preferred posting format for your Facebook posts.
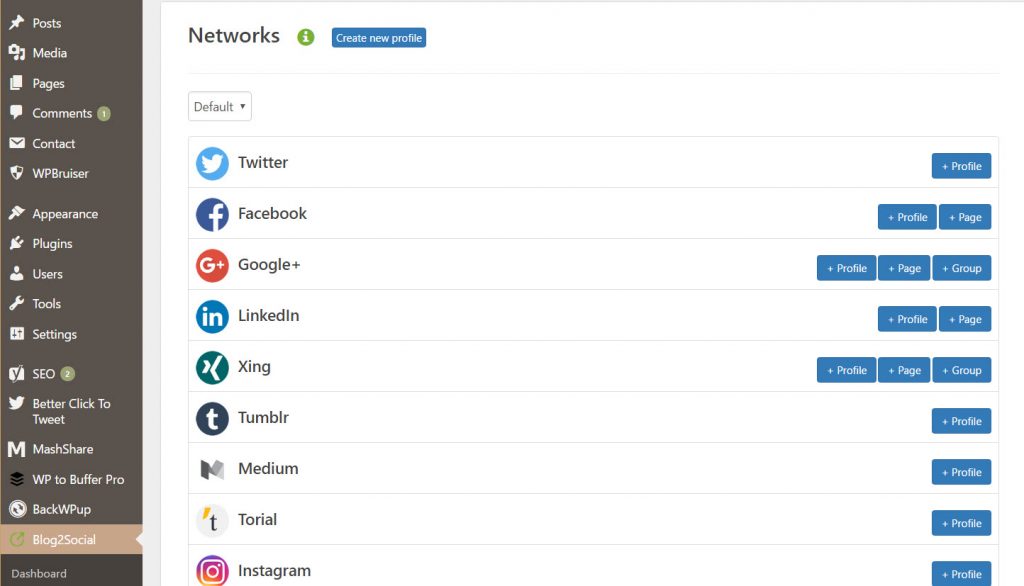 Connect all of your networks, pages, and groups in just a few clicks.[/caption]
Set up your accounts under the menu item "Networks." The plugin's premium version provides a lot more sharing options. You can not only connect your profiles but also link pages and groups that you're active in.
This feature can be useful when it comes to Google+ or Xing, as many users of these networks are very active in groups.
Additionally, a premium license also allows you to connect, and supply multiple accounts per network, which can be very handy especially for highly active social media users.
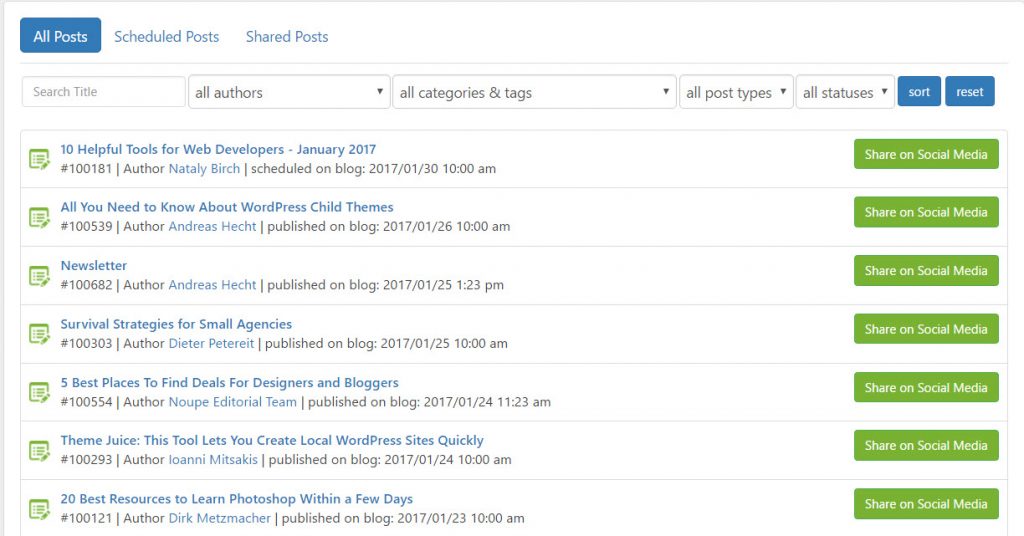 Sharing Individual Posts Made Easy With Blog2Social.[/caption]
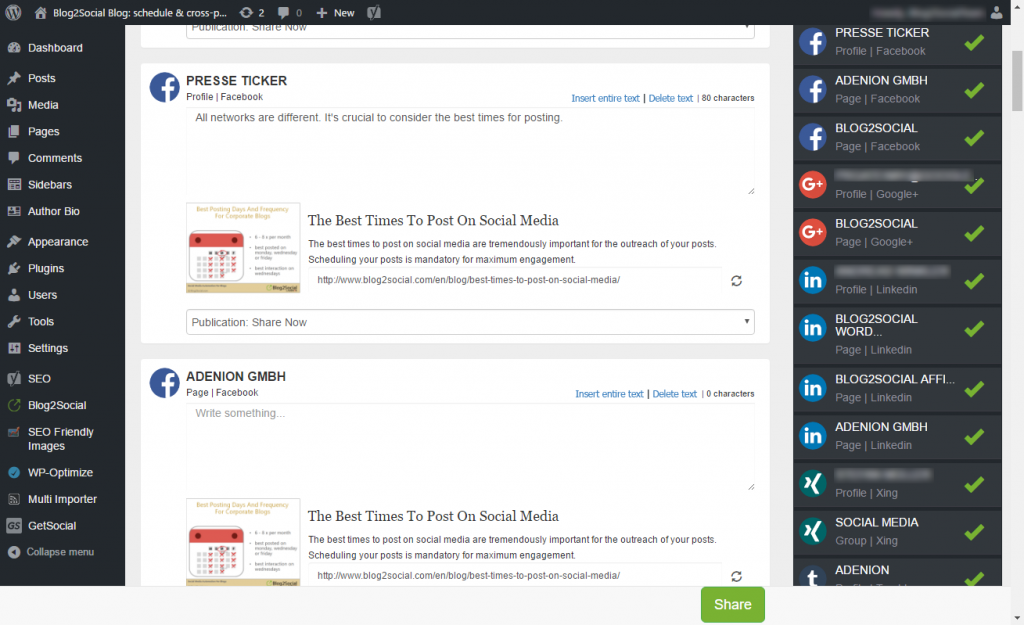 Here, you get to write a unique text for each social network, as well as add hashtags, and links. On the right side of this window, you have the option to deselect social media accounts that you don't want to post on anymore. A click on the respective profile turns off the account.
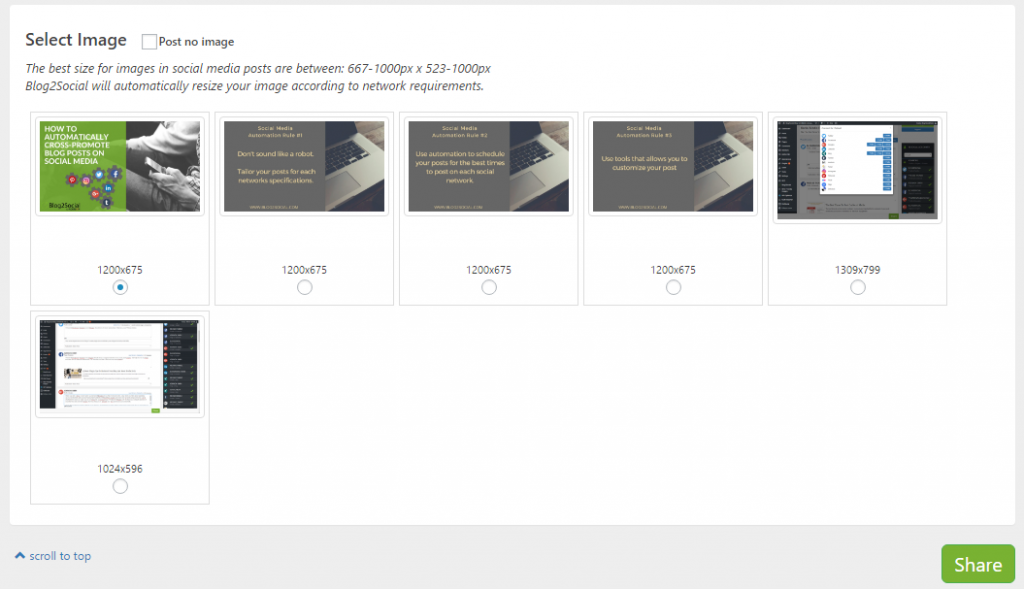 When you scroll all the way down, you get to the picture selection. Here, you can choose if you want to transfer images. You also get to select which images will be posted.
Once you set everything, all there's left to do is to click "Share." Now, your blog posts will either be posted at the times you defined or at the best times as identified by Blog2Social.
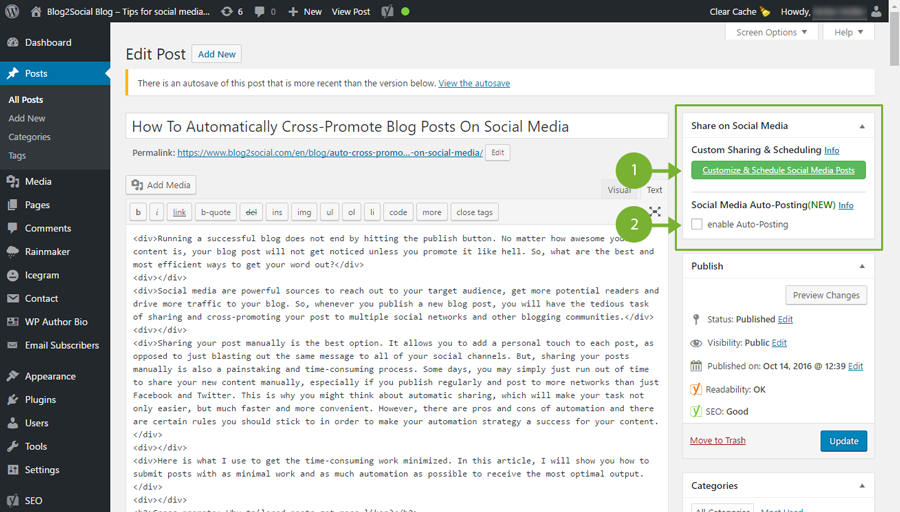 Blog2Social provides two general options for sharing your blog posts on social media:
1. Custom Sharing & Scheduling to customize your posts individually in one easy step and to schedule your post or to publish immediately;
2. Auto-Posting to automatically share your blog posts whenever you publish a new post.
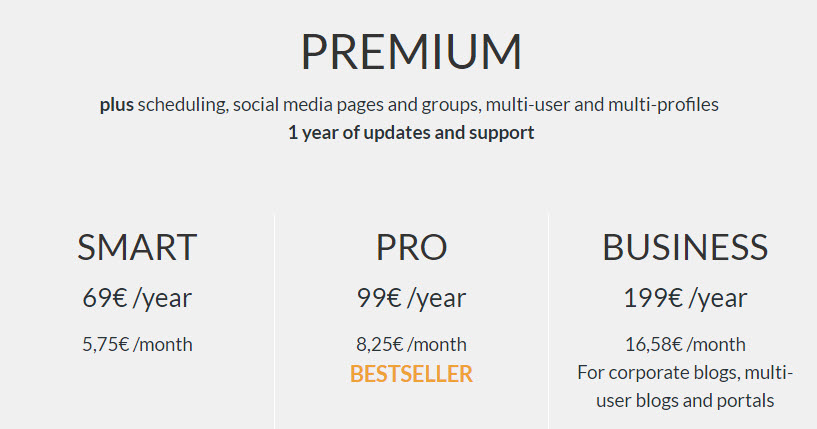 The smart license for only 69 Euro a year should be sufficient for the majority of users. The pro license is suitable for smaller multi-author blogs with up to five users.
Buy a Premium License for Blog2Social »
Why Most Social Media Plugins Suck
- You can't customize your posts for the social media, only the title, excerpt, and the article image will be posted.
- Your social media accounts are triggered right after your article has been published.
- You can only supply one account per network.
Why Blog2Social is Better
Imagine there was a plugin that automatically posts your articles on social media at the right times. Every social media account would get its post at the time where the most users are online. On top of that, every post would be adjusted to the requirements of the respective networks. Every article could receive a unique teaser, a custom image, and specific hashtags and links. Related: Blog2Social vs Social Network Auto Poster To your followers, all of this would feel as if you manually wrote each post on social media. You think there was no way this exists? Blog2Social makes all of this possible! Here Are Some of the Advantages:- The social media plugin Blog2Social publishes blog posts on your profiles, business pages, and community websites, as well as in groups on all of your networks.
- You get to individually adjust your social media posts to the requirements of the networks using comments, #hashtags, tags, or @handles - all in one step, and very easy.
- Publish new or older articles with adjusted images, and backlinks to your website.
- You can create different profiles for multi-author blogs, which can be connected to different profiles, pages, and groups. This lets you boost your range even more.
Blog2Social Supports the Following Networks
Aside from the "regular" social media, Blog2Social also supports blogs, business, image, and social bookmark networks. For example:- Facebook - Profiles, Groups, and Pages
- Google+ - Profiles, Pages, and Groups
- LinkedIn - Profiles, Business, and Focus Pages
- Xing - Profiles, Business Pages, as well as your XING Groups
- Flickr
- Tumblr
- Medium
- Torial
- Diigo - Automatically publish a link to your blog post, and create a bookmark for your post
- Delicious - Automatically publish a link to your article, and create a bookmark for your post including tags.
Installing Blog2Social, and Requesting a Premium Test License

- Developer: Blog2Social
- Work in Progress: Yes
- Latest Update: 26.01.2017
- Costs: free via WordPress.org (Premium licenses exist)
- License: GNU GENERAL PUBLIC LICENSE
- Known Compatibility Issues: unknown
- Developer Homepage: Blog2Social Homepage
- Download on WordPress.org
Testing the Premium Functions for Free for 30 Days
You don't have to buy a pig in a poke since you get to check the premium functions for free for 30 days. You don't have to give any payment data; the license expires automatically. Register on the website of Blog2Social to receive your test license via email.Setting Up and Using Blog2Social
 On the Blog2Social „Settings“ page you can check the option to use the link-shortener and activate auto-posting by default (General). The “Best Time Settings” show pre-defined time windows suggesting best times to post. You can edit the suggested times and save them for the “My times” button on the “Custom Scheduling & Sharing” page. On the “Network Settings” you choose your preferred posting format for your Facebook posts.
1 - The Settings
After the installation, go into the settings and tick the selection box for the link shortener. The Blog2Social shortener transforms your links, and publishes them on social media in that shortened form. If you choose this option, you prevent that the networks deny frequently repeated posts with the same links. The b2s.pm shortener generates a new link for each social media post. This is important if you want to post your articles multiple times on the same networks. On the right side of the settings, you enter your test license or your premium license. The second option in the settings lets you define the times on which your posts will be published. I recommend using the "Best Time Scheduler." This tool is a premium feature that always posts your social media posts during the times when the most people are online on each respective network. This Increases Your Article's Range Significantly.Blog2Social provides a complete time scheme for the best times to share on the different social media channels. If you choose this option, the calculated time frames are displayed below the respective networks. You are able to edit these times, or create a custom time scheme for sharing your blog posts from scratch.
2 - Connecting Networks
[caption id="attachment_100775" align="alignnone" width="1024"] Connect all of your networks, pages, and groups in just a few clicks.[/caption]
Set up your accounts under the menu item "Networks." The plugin's premium version provides a lot more sharing options. You can not only connect your profiles but also link pages and groups that you're active in.
This feature can be useful when it comes to Google+ or Xing, as many users of these networks are very active in groups.
Additionally, a premium license also allows you to connect, and supply multiple accounts per network, which can be very handy especially for highly active social media users.
3 - Customizing and Sharing Posts
[caption id="attachment_100778" align="alignnone" width="1024"] Sharing Individual Posts Made Easy With Blog2Social.[/caption]
Assigning Unique Texts to Each Network
The menu item "Dashboard" displays your blog posts. It only takes one look to see if, and when your posts have been shared. A click on the button "Share on Social Media" opens a new window, where you can customize your posts before sharing. Here, you get to write a unique text for each social network, as well as add hashtags, and links. On the right side of this window, you have the option to deselect social media accounts that you don't want to post on anymore. A click on the respective profile turns off the account.
The Image Selection
 When you scroll all the way down, you get to the picture selection. Here, you can choose if you want to transfer images. You also get to select which images will be posted.
Once you set everything, all there's left to do is to click "Share." Now, your blog posts will either be posted at the times you defined or at the best times as identified by Blog2Social.
Sharing Immediately After Releasing an Article
The plugin adds a new button to the "Publish" field on the "Publish Post" page of your WordPress. Blog2Social provides two general options for sharing your blog posts on social media:
1. Custom Sharing & Scheduling to customize your posts individually in one easy step and to schedule your post or to publish immediately;
2. Auto-Posting to automatically share your blog posts whenever you publish a new post.
The Cool Premium Functions of Blog2Social
The plugin really excels when it comes to its premium functions. Here are all the advantages of the premium version at a glance:- Multiple Accounts, Profiles, Groups In addition to the profiles, you are also able to connect pages, groups, and communities as well as multiple profiles, pages and groups per network in just one easy step. (geänderter Text)
- Creating Different Profiles Under the menu item “Networks” you can set up different profiles of network combinations, allowing you to switch between them whenever you want to. Very useful for a multi-author blog, for instance.
- Social Media Auto-Posting Automatically share your blog posts on your selected social networks whenever you publish your post.
- The Best Time Scheduler Time can be the decisive factor when it comes to a post being noticed or drowned in the flood of messages. It takes a lot of experience, and analysis to figure out the ideal times for each network. That’s why Blog2Social has put a lot of time into figuring out the actual best times to provide in the “Best Time Scheduler”. You can define your own custom times or you can edit any suggested time according to your needs. (Den Satz bitte am Ende anhängen.)
- Staggered Sharing Determine your times for automatic sharing on the different networks.
- Repeated Sharing Share your posts on individual networks repeatedly.
- Social Media Planner Schedule your social media posts for up to 52 weeks in advance.
- Sharing Old Blog Posts You can also share earlier blog posts on your networks. Select between calendar and list view.
- Reporting Follow the state of your releases directly to the place of publishment via links.
- Changing the Time Schedule If necessary, check and modify the planned social media postings.
- Performance Report (coming soon) Observe the likes, comments, and shares for each posting
The Prices of Blog2Social
The prices for the plugin's individual premium licenses are fair. The smart license for only 69 Euro a year should be sufficient for the majority of users. The pro license is suitable for smaller multi-author blogs with up to five users.
Buy a Premium License for Blog2Social »
