Stitches: Free CSS Sprite Generator

As we know, less files to download mean better loading performance and page reproduction. Therefore, icons and other images, particularly small images, are often combined into a sprite. A sprite is a collection of several images put into one image file. Creating a sprite manually requires some work. The images are arranged in an image file and their position, width, and height need to be defined in a stylesheet. The Stitches sprite generator speeds up these processes immensely.

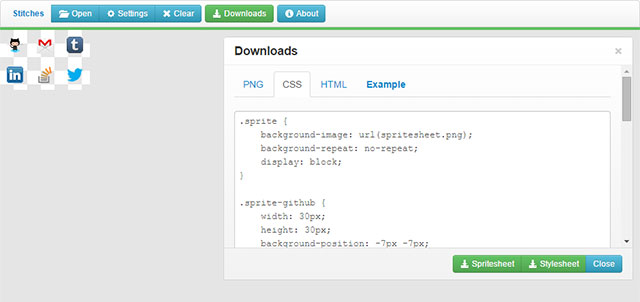
 Once all image files are uploaded and named, you can download the sprite file as PNG accompanied by the appropriate stylesheet. The stylesheet file contains a general class with the name of the prefix where the sprite file is embedded as a background image. Moreover, a class is defined for each image specifying the image's position within the sprite via "background-position". It also contains information about the width and height of the images. The class name for each image consists of the prefix and the specific name you gave each image in the generator.
After you embed the stylesheet into an HTML document, you can assign each sprite image to an HTML element through the appropriate class.

Upload Simple Images
There's probably no easier way to create sprites than with Stitches. Images you want to combine into a sprite file can be uploaded through a web interface. It supports JPG, PNG, and GIF format. Once uploaded, the images are automatically placed on a work space. You can determine if you want the images to be arranged as a compact block, next to each other, or one below the other. You can also adjust the space between the individual images. Each image requires a distinct name, so that it can be assigned to an HTML element later on. In addition, a prefix is added to the sprite preceding all classes that will be generated. Once all image files are uploaded and named, you can download the sprite file as PNG accompanied by the appropriate stylesheet. The stylesheet file contains a general class with the name of the prefix where the sprite file is embedded as a background image. Moreover, a class is defined for each image specifying the image's position within the sprite via "background-position". It also contains information about the width and height of the images. The class name for each image consists of the prefix and the specific name you gave each image in the generator.
After you embed the stylesheet into an HTML document, you can assign each sprite image to an HTML element through the appropriate class.
<div class="sprite sprite-facebook"></div>
In the above example, we assume that the sprite prefix is called "sprite". That's the default name. Besides the "sprite" class, "sprite-facebook" is also assigned to the <div> element. So, the image with the name "facebook" would be displayed. The height and width of the image is also assigned to the <div> element.
Even More Compact With Data URIs
If you find that a PNG and a stylesheet file still cause too many requests, you can put the whole sprite with all image files into the stylesheet. To do so, embed the image file using a data URI within the stylesheet file. Note that the size of the data URI is larger than the size of "normal" files, but you'll have one file containing all the content. Depending on the number of images you put into the sprite, you can embed several single requests within one request. If you don't use data URIs, it will be at least two requests. If you use LESS, you can choose the LESS syntax instead of a standard CSS file.Save Settings
After you've created a complex sprite with Stitches and want to add or remove graphics later on, you can save all settings of the sprite as a text file. This file contains the positions, names, and all images of the sprite. Copy and paste the content of the text file into the import field of the sprite generator to load the settings. Then you can edit your sprite and regenerate it, without the need of uploading each single image again. The new settings are also provided as a text file.Host Stitches Yourself
If you don't want to use Stitches on the developer's project site, you can host the generator yourself. It's licensed under the MIT license and can be installed quickly . The library requires jQuery, Bootstrap, and Modernizr. Stitches doesn't use a server-side programming language and can therefore be operated offline. The download package contains all required files, including the external libraries. Once all JavaScript and stylesheet files have been added to the HTML header, you only need to mark up a container.<div class="stitches"></div>
There's nothing else to be done besides assigning the class "stitches" to an element. A default configuration that loads automatically at each start can be allocated optionally. Mark up the images and their names for the sprite via HTML.
<div class="stitches">
  <img src="facebook.png"data-name="facebook" />
</div>
In the above example, a PNG file is embedded. The name for the images is specified by the data attribute "data-name".
The project site provides a comprehensive documentation that helps you through the installation and configuration. Here you'll find the well-commented source text of all JavaScript files.

Ah, you made that sprite creation much easier! Thank you so much! Glad to know HTML5 supports it.