Simbla 2016: New Data-Driven Website Application Builder

Many homepage builders promise you to be able to create websites without requiring any knowledge of HTML, CSS, and JavaScript. Then you find out that this comes at the cost of having to succumb to more or less flexible premade design templates. The website builder Simbla is one of the exceptions that don't just provide pretty templates. The site layout is responsive and based on HTML5. That said, Simbla offers everything that contemporary websites need. Now, thanks to the brand-new database builder, you also get to visualize, manage, and edit extensive and complex data.

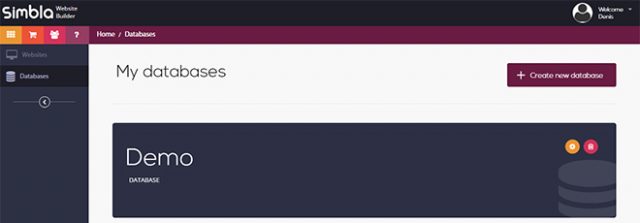 Setting up a Database in Simbla[/caption]
However, the biggest new addition to its feature set is Simbla's online database builder. It allows you to create your own database and fill it with content. Due to the extensive assignment of permissions, you are in full control over who's allowed to create, read, alter, and delete data sets.
The databases represent an own area that is independent of the websites. After setting up a database, define users, roles, as well as tables. For that, there's the default user "public", which takes care of the public access to the website. However, you also get to set up other users that will only have access after logging in, for example.
[caption id="attachment_77231" align="alignnone" width="640"]
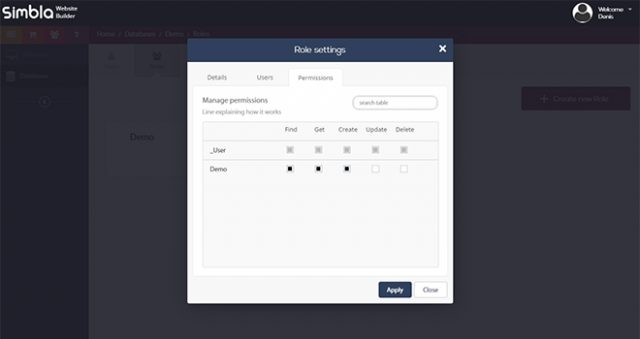 Defining Roles and Rights[/caption]
You get to distribute different rights for each user. To give an example, it is possible to only assign reading rights to the user "public", and writing rights to other users. Here, the rights "find" to search, "get" to display, "create" to create, "update" to update, and "delete" to delete a dataset, are available to you.
After assigning users, roles, and rights, create one or more tables. Comfortably add columns and define their type. Among others, the types include character strings, numbers, arrays, boolean values, and files. In contrast to databases like MySQL, files such as images and documents can easily be integrated, and then be accessed later on. Additionally, you also receive a preview of image files.
[caption id="attachment_77229" align="alignnone" width="640"]
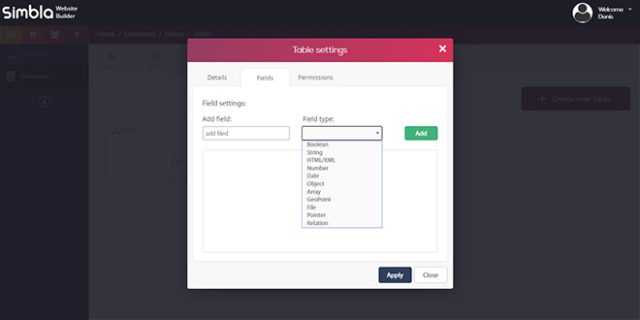 Creating a Table, Defining Columns and Types[/caption]
The columns "Id", "createdAt", and "updateAt" are created and taken care of automatically. Thanks to the graphic user interface, creating and managing databases becomes as easy as child's play. Setting up new rows and filling them with content is a snap.
If you need to use a data table somewhere else, export it into a CSV with one click. Only embedded files are ignored during the export.
 "App Widgets"[/caption]
There are unique content elements called "app widgets," which allow you to create a database connection. For that, you need to switch to the Pro mode, however. Then, you get to establish a login form for registered users, or a form that writes data into the table. Of course, you are also able to display your database's content as a table on your website. All you need to do is choose from different table layouts.
Due to the extensive options, you easily construct simple as well as complex website applications, without much effort or programming knowledge.
For instance, when you want to offer content to registered users only, all you need to do is add a form that lets the users register. Email verification is done automatically. Your registered users will be displayed in the database area.
[caption id="attachment_77235" align="alignnone" width="640"]
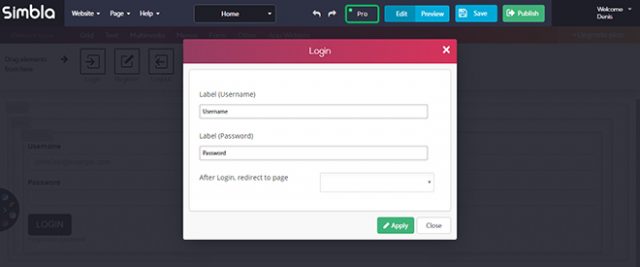 Login Form[/caption]
A login form is what allows registered users to check in and out. Additionally, you can also decide that certain pages are only available to logged-in users.
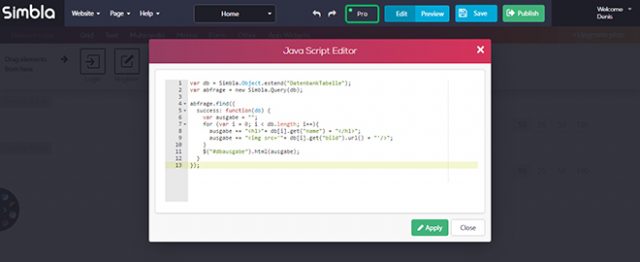 JavaScript Database Request[/caption]
On top of that, there are plenty of comparison options like "lessThan()", "greaterThan()", as well as the option to limit a request to a specified number of results via "limit()", as well as skip data sets with "skip()".

Creating a Database and Filling it With Content
Noupe readers already know Simbla as we've already published a detailed review here and here. The creators of Simbla don't only want to work well with current standards. Current design trends are also always considered. For instance, there are new templates with parallax effects. Instead of static scrolling, the website's different elements in the background and foreground are moved at different speeds while scrolling. This creates the illusion of motion, the so-called parallax effect. [caption id="attachment_77227" align="alignnone" width="640"] Setting up a Database in Simbla[/caption]
However, the biggest new addition to its feature set is Simbla's online database builder. It allows you to create your own database and fill it with content. Due to the extensive assignment of permissions, you are in full control over who's allowed to create, read, alter, and delete data sets.
The databases represent an own area that is independent of the websites. After setting up a database, define users, roles, as well as tables. For that, there's the default user "public", which takes care of the public access to the website. However, you also get to set up other users that will only have access after logging in, for example.
[caption id="attachment_77231" align="alignnone" width="640"]
 Defining Roles and Rights[/caption]
You get to distribute different rights for each user. To give an example, it is possible to only assign reading rights to the user "public", and writing rights to other users. Here, the rights "find" to search, "get" to display, "create" to create, "update" to update, and "delete" to delete a dataset, are available to you.
After assigning users, roles, and rights, create one or more tables. Comfortably add columns and define their type. Among others, the types include character strings, numbers, arrays, boolean values, and files. In contrast to databases like MySQL, files such as images and documents can easily be integrated, and then be accessed later on. Additionally, you also receive a preview of image files.
[caption id="attachment_77229" align="alignnone" width="640"]
 Creating a Table, Defining Columns and Types[/caption]
The columns "Id", "createdAt", and "updateAt" are created and taken care of automatically. Thanks to the graphic user interface, creating and managing databases becomes as easy as child's play. Setting up new rows and filling them with content is a snap.
If you need to use a data table somewhere else, export it into a CSV with one click. Only embedded files are ignored during the export.
Building Simple Web Applications Using Databases
Once your database is done, you can integrate it into your Simbla website extremely quickly and comfortably. To do so, you first need to choose the database from the website settings. Afterward, all of its contents are made available. [caption id="attachment_77232" align="alignnone" width="640"] "App Widgets"[/caption]
There are unique content elements called "app widgets," which allow you to create a database connection. For that, you need to switch to the Pro mode, however. Then, you get to establish a login form for registered users, or a form that writes data into the table. Of course, you are also able to display your database's content as a table on your website. All you need to do is choose from different table layouts.
Due to the extensive options, you easily construct simple as well as complex website applications, without much effort or programming knowledge.
For instance, when you want to offer content to registered users only, all you need to do is add a form that lets the users register. Email verification is done automatically. Your registered users will be displayed in the database area.
[caption id="attachment_77235" align="alignnone" width="640"]
 Login Form[/caption]
A login form is what allows registered users to check in and out. Additionally, you can also decide that certain pages are only available to logged-in users.
Complex Web Applications Via JavaScript
The database builder allows for far more complex web applications as well. Instead of using a simple "app widget", you also have the option to conduct extensive database requests and operations. For that, there's a custom JavaScript API. Thanks to the API, Simbla can work as a website application builder, which enables you to create custom requests, complex CRM systems, or even realize order handling, and booking requests. Getting into the API is rather easy. Use "Simbla.Object.extend()" to access a database table, and make a request that you can work with via "Simbla.Query()".var db = Simbla.Object.extend("DatabankChart");
var abfrage = new Simbla.Query(db);
There are plenty of options to categorize and limit your request. Here, "descending()", and "ascending()" make sure that the table is displayed in a descending or ascending order, respectively.
[caption id="attachment_77234" align="alignnone" width="640"] JavaScript Database Request[/caption]
On top of that, there are plenty of comparison options like "lessThan()", "greaterThan()", as well as the option to limit a request to a specified number of results via "limit()", as well as skip data sets with "skip()".
arequest.greaterThan("ColumnYear", 2010);
The previously sorted, or limited data sets are searched via "find()", and can then be distributed.
request.find({
  success: function(db) {
    var output = "";
    for (var i = 0; i < db.length; i++){
      output += "<h1>"+ db[i].get("name") + "</h1>";
      output += "<img src='"+ db[i].get("image").url() + "'/>";
    }
    $("#dboutput").html(output);
  }
});
In our example, the data sets are written into a variable via "get()", and then into the element with the ID "output" using "html()".
The website builder also provides a custom editor for JavaScript. For the HTML output, you need to place an HTML content element on a page and assign an element to it that has the ID defined via JavaScript.
<div id="dboutput"></div>
