How to improve your graphic design process

Graphic design is integral for enterprises that want to develop a viable online presence. From website design to social media posts and more, the power of good graphics is evident across the World Wide Web.
So, unsurprisingly, graphic design is a highly sought-after skill. Interestingly, 71% of companies create ten times more design assets than they used to in order to support the different channels. As a result, the demand for graphic designers is quite high.
But as the saying goes, there is always room for improvement. Most graphic designers devise their own process to reach their desired output, but it is always possible to streamline it further.
Let's discuss how to optimize the structure of your graphic design process and the best practices to follow.
How you should structure your graphic design process
Of course, some special projects involve specific processes, but you can follow a general format to make sure you can complete it on time without compromising quality. The key steps to follow are:
1. Create a briefing
The creative brief is often the first step of the graphic design process. It helps the designer better understand the needs of the client, who can be internal or external to the company. This is a critical step because designers need all the necessary information about their clients, the company, and expectations.
The brief serves as the foundation on which you begin working on the project, meaning it affects the entire process. To ensure that the brief is easy to understand and well organized, you should use third-party tools.
2. Brainstorm ideas
The brainstorming process is an important step and can only be done once you have entirely understood your client's brief. To generate ideas for your design, start by grabbing a paper and pen to analyze the purpose of the design.
Consider the thoughts and emotions that you want to trigger through your design. Also, dig deeper to tap into the message you want it to convey. Focus on these points while you come up with ideas. Be sure not to think too hard, though; let your ideas flow because you never know what may end up inspiring a brilliant design.
For more inspiration, search for ideas on the internet or communities and platforms specifically for designers – more on that later in the article, so keep reading!
3. Create first sketch & drafts
This step involves the designer drawing up rough sketches based on the ideas they generated. It can be done using any tools you are comfortable with. At this stage, do not worry about how perfect the design is and whether or not it is finalized.
This step is just there to help you know whether or not you are on the right track, and it can also be shared with your client to get their initial feedback. But above all, it will help you get a clearer idea of how to proceed. You can use a solution like Quicktools by Picsart to get this initial sketch done quickly.
4. Get feedback
Once you have created your first sketch and a couple of drafts, the next step is to get feedback from your client. This is crucial, as the feedback you receive at this stage will influence everything that follows and the direction in which the design is going.
An online proofing tool like Filestage makes it easy for your client to give precise feedback. Additionally, the commenting and annotation features allow reviewers to leave suggestions and add ideas directly to the design.
5. Adapt your graphic designs
This is the fun part, where you get to do your thing and really shine. With the feedback from the previous step in mind, you now have a clear direction and can start detailing your design. During the process, you adapt and advance your sketches and create different variations of your design.
Creating variations of your design will make your client happy as they can then better focus on the smaller details. At the same time, you have the leverage to play around slightly with typographic pairings, color palettes, and structure.
6. Get final approval on your design
After sharing the different variations of your design with the client, you will receive more feedback from them. This helps you to better understand what they want, allowing you to adapt the design until they are happy and you receive their final approval.
Three best practices to make the most of your process
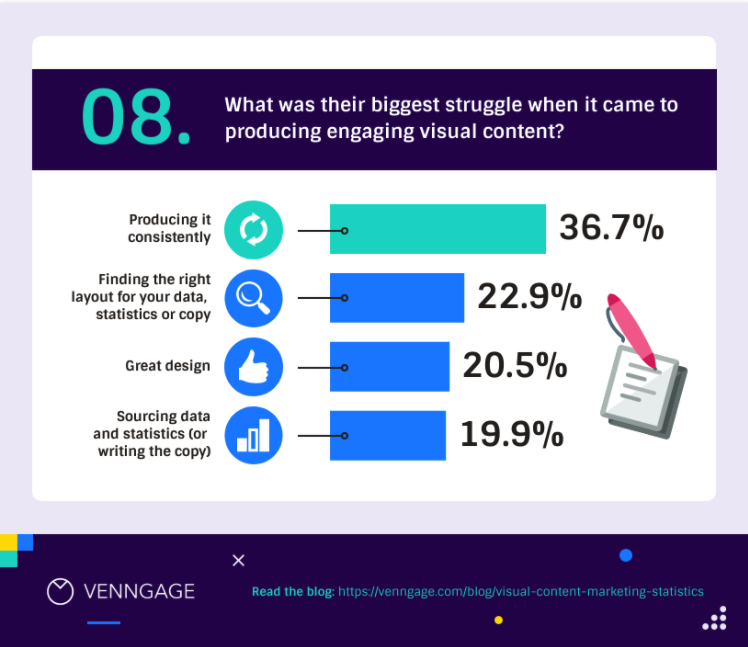
For nearly 36.7% of marketers, it is a struggle to remain consistent when creating engaging visual content.

Therefore, we have three tips to help you deal with this dilemma and make your life as a graphic designer easier:
1. Use the right tools for support.
Since graphic design leads to such subjective outcomes, it is always good to have other professionals validate your work and inspire you. Tools such as Dribbble and Canva provide an outlet for designers to take inspiration from others and receive constructive criticism. These can be used during the brainstorming sessions and the first sketch steps.
To find photos and vectors to help embellish your design, you should check out Freepik or Drawtify online illustrator, which can either help inspire you or give you a ready-made structure to build on for projects with tight deadlines. This can be used when you are adapting your designs to get to the final stage. Here's some more popular software among graphic designers.
2. Set up a clear workflow for feedback and approvals.
Designers rely heavily on their client's feedback during the design process. Instead of sharing multiple files and long email threads, you can manage the entire feedback workflow in one place.
Approval software like Filestage streamlines the entire review and approval process for any file type, making it easier for both clients and designers to get on the same page.
On the centralized platform, designers can share their work, and clients can leave their input directly in the design. Plus, designers can react to clients’ comments and feedback in real-time. This makes collaboration much easier and helps avoid misunderstandings.
3. Adapt the process to your team's needs.
It is important to note that there isn't a ‘one-size-fits-all’ solution to the graphic design process, so adapt the steps described above to best integrate into your existing routine and workflow.
Of course, trends and requirements in the design industry are constantly changing, so this solution is not everlasting. Do not hesitate to rethink your processes and workflows from time to time, taking note of the methods that work best for you.
Conclusion
Whether you are a novice or a pro graphic designer, a smooth and solid process is critical to your success. Also, you do not have to do it by yourself; there are several helpful tools out there to take some of the pressure off you.
So, be sure to create a solid structure for the graphic design process to help you continually produce high-quality work.
Featured Image by Theme Photos on Unsplash

nice posting thanks