Adobe Illustrator Tutorial: Create a Semi-Realistic Oil Barrel Illustration
In the following Adobe Illustrator tutorial you will learn how to create a semi-realistic oil barrel illustration. First, we'll use several rectangles along with some professional pixel perfect vector shape building techniques to create the starting shapes. Next, we'll break some of the starting shapes apart as needed using a bunch of Pathfinder tools.
Once the overall illustration comes together, we'll use some warp effects to add a three-dimensional look to the oil barrel. Finally, we'll add a grungy texture using a simple radial gradient, some simple blending techniques and a Sponge effect. The final color used for the oil barrel is easily editable so it won't be difficult for you to use the colors that you like.


 y
y
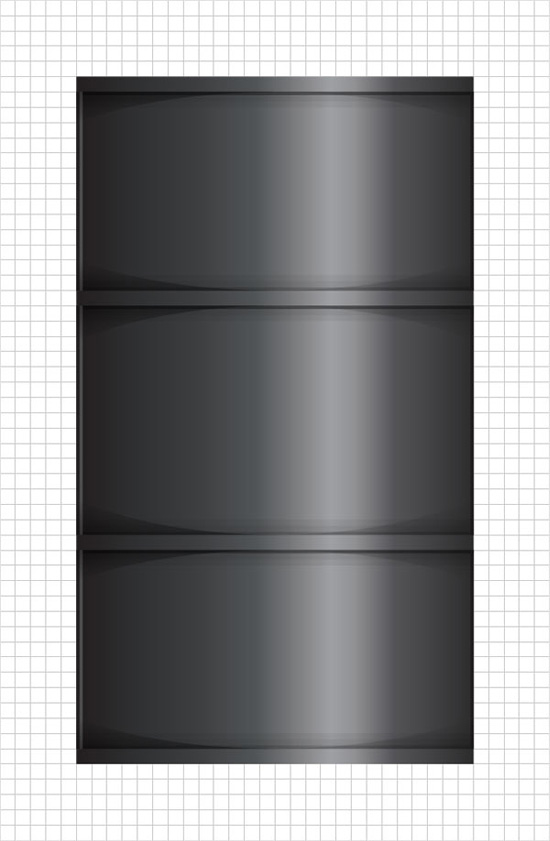
Final Image
As always, this is the final image that we'll be creating:
Step 1
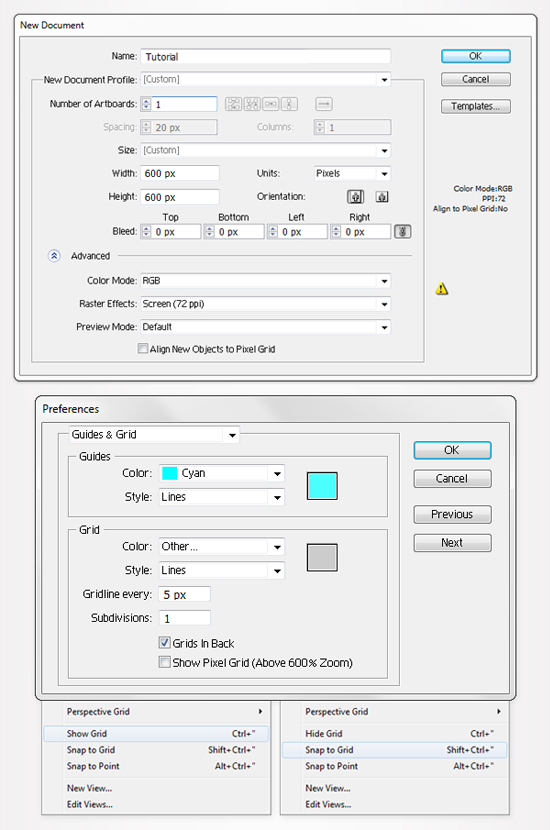
Hit Control + N to create a new document. Enter 600 in the width and height box then click on the Advanced button. Select RGB, Screen (72ppi) and make sure that the "Align New Objects to Pixel Grid" box is unchecked before your click OK. Now, turn on the Grid (View > Grid) and the Snap to Grid (View > Snap to Grid). Next, you'll need a grid every 5px. Go to Edit > Preferences > Guides & Grid, enter 5 in the Gridline every box and 1 in the Subdivisions box. You can also open the Info panel (Window > Info) for a live preview with the size and position of your shapes. Do not forget to set the unit of measurement to pixels from Edit > Preferences > Unit > General. All these options will significantly increase your work speed.
Step 2
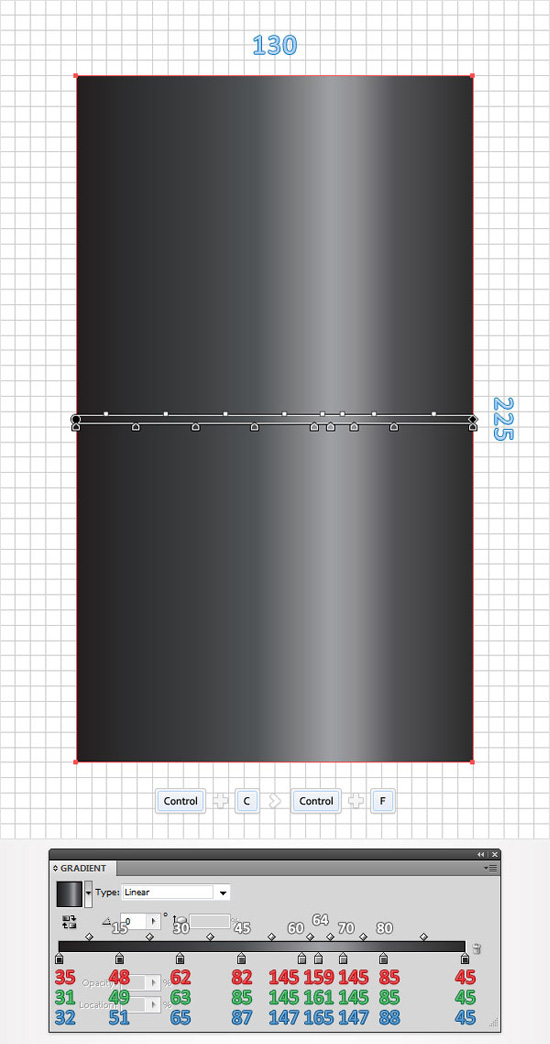
Pick the Rectangle Tool(M) and create eight 130 by 225px shapes. Fill it with the linear gradient shown below then make a copy in front (Control + C > Control + F). The white numbers from the gradient image stand for location percentage.
Step 3
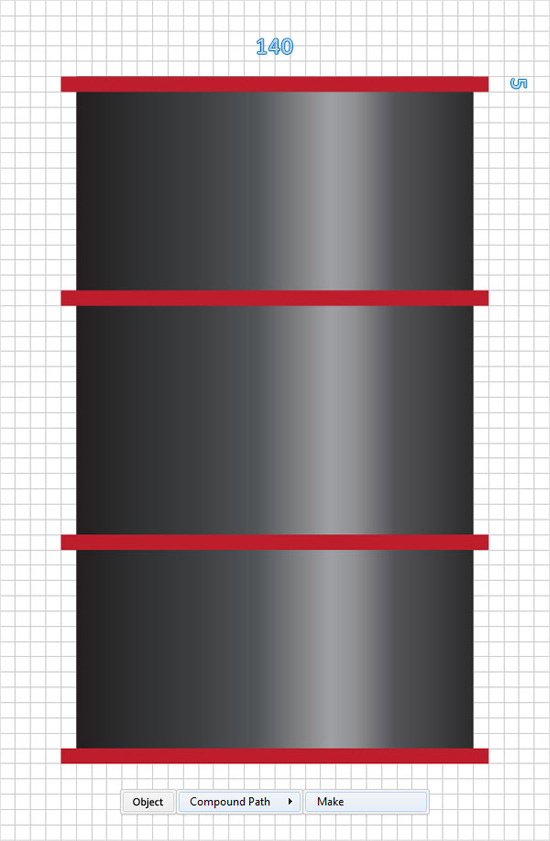
Again, use the Rectangle Tool(M) and create four, 140 by 5px shapes. Fill them with a simple red, and place them as shown in the following image. The Snap to Grid should ease your work. Select all four rectangles and turn them into a compound path (Object > Compound Path > Make).
Step 4
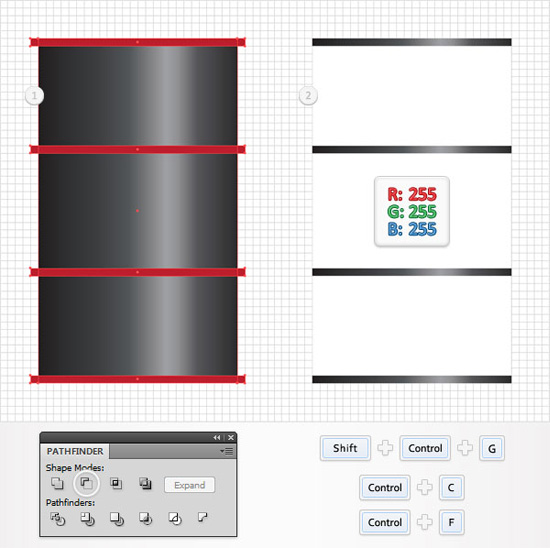
Select the compound path created in the previous step along with the copy of the rectangle created in the second step, then open the Pathfinder panel (Window > Pathfinder) and click on the Minus Front button. Move to the Layers panel and you will find a group with three simple rectangles. Ungroup them (Shift + Control + G), fill them with white then duplicate them (Control + C > Control + F).
Step 5
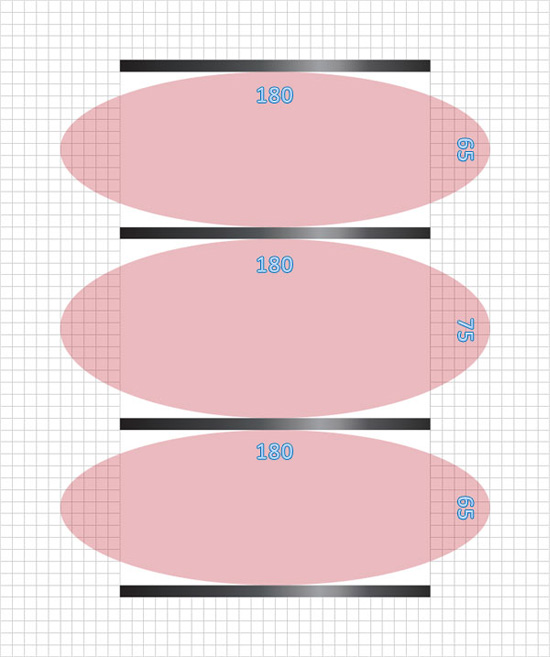
Pick the Ellipse Tool(L), create two, 180 by 65px shapes and a 180 by 75px shape. Fill them with a random color and place them as shown in the following image. Again, the Snap to Grid will ease your work.
Step 6
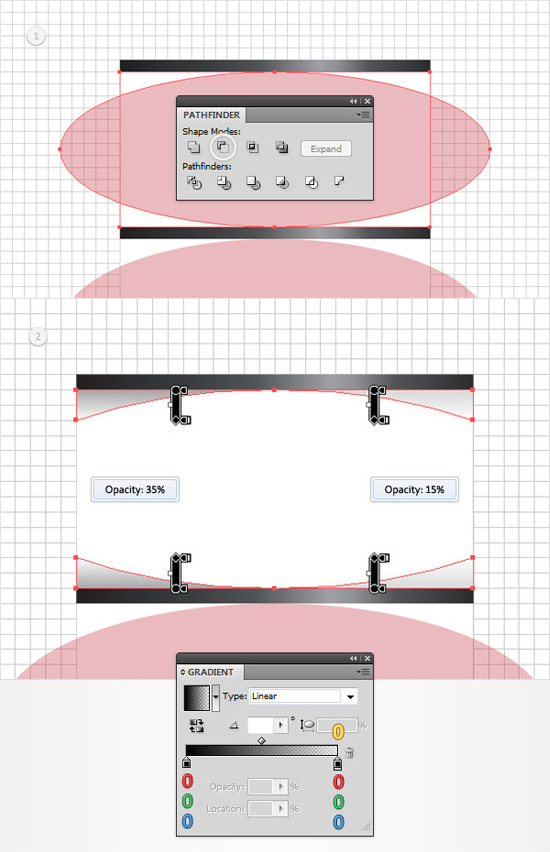
Focus on top shape created in the previous step. Select it along with the copy of the top, white rectangle and click on the Minus Front button from the Pathfinder panel. Move to the Layers panel and you will find a group with four new shapes. Select the two, left shapes and lower their opacity to 35% then select the other two shapes and lower their opacity to 15%. Finally, fill them with the linear gradient shown below. The yellow zero from the gradient image stands for opacity percentage.
Step 7
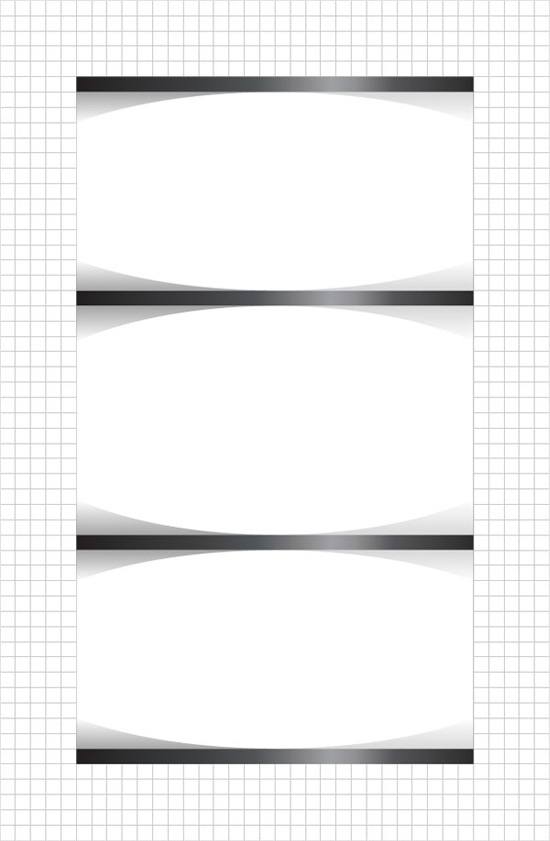
Move to the other two shapes created in the fifth step and repeat the techniques mentioned in the previous step.
Step 8
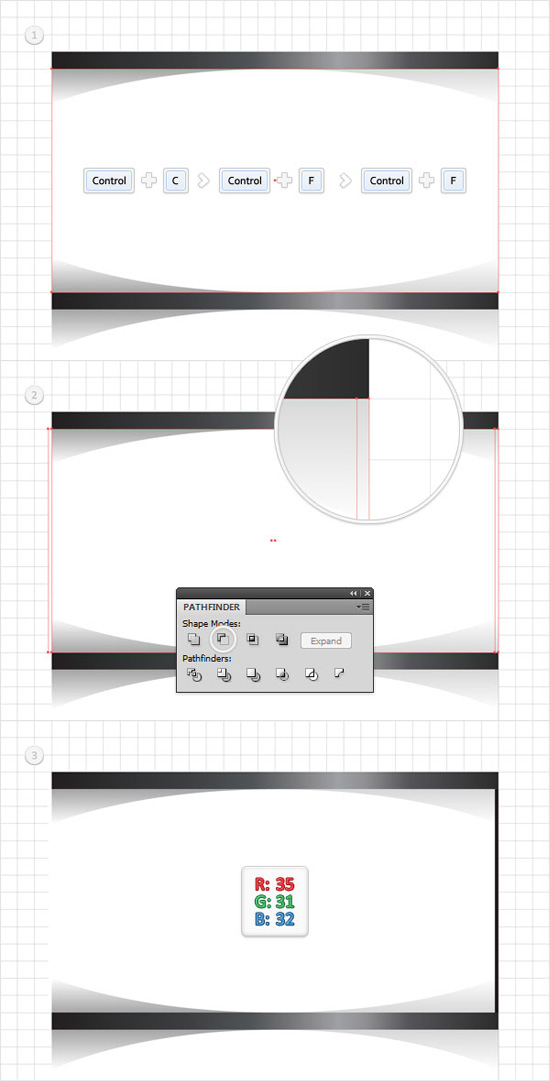
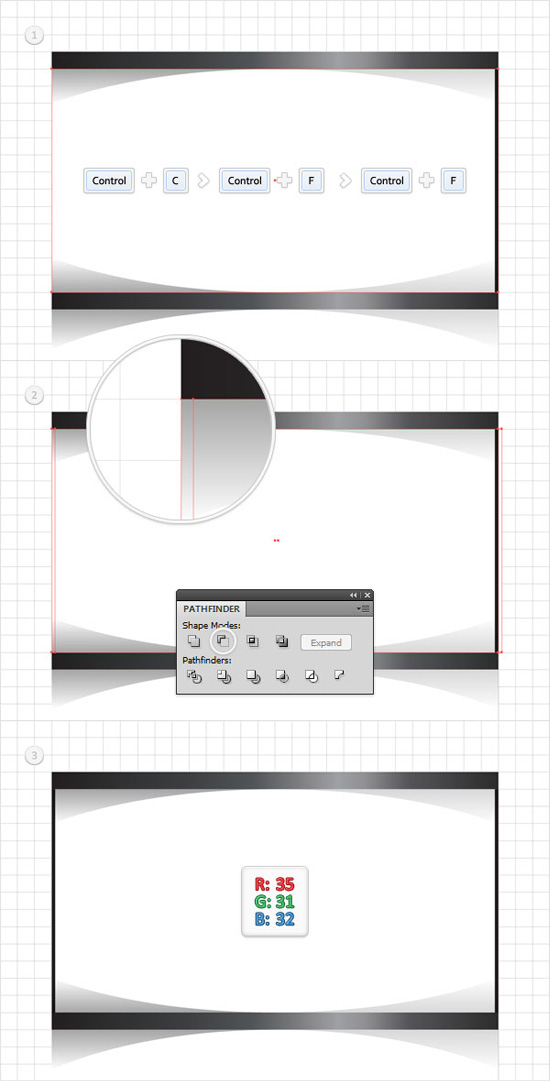
Disable the Snap to Grid (View > Snap to Grid) then go to Edit > Preferences > General and make sure that the Keyboard Increment is set at 1px. Focus on the top, white rectangle, select it and make two copies in front (Control + C > Control + F > Control + F). Select the top copy and move it 1px to the left. Reselect both copies and click on the Minus Front button from the Pathfinder panel. Fill the resulting shape with R=35 G=31 B=32.
Step 9
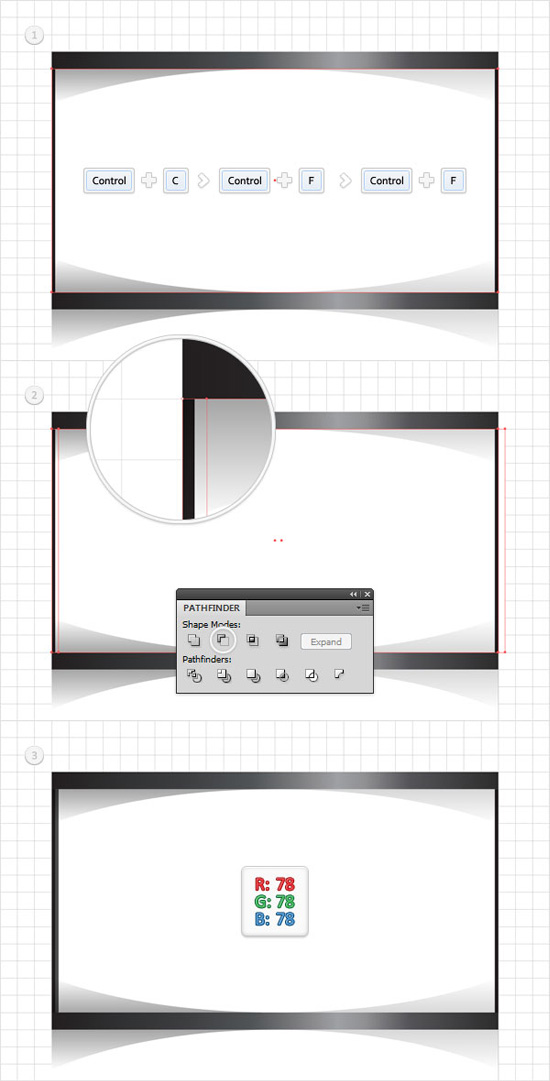
Reselect the top, white rectangle and make two copies in front (Control + C > Control + F > Control + F). Select the top copy and move it 1px to the right. Reselect both copies and click on the Minus Front button from the Pathfinder panel. Fill the resulting shape with R=35 G=31 B=32.
Step 10
Reselect the top, white rectangle and make two new copies in front (Control + C > Control + F > Control + F). Select the top copy and move it 2px to the right. Reselect both copies and click on the Minus Front button from the Pathfinder panel. Fill the resulting shape with R=78 G=78 B=78.
Step 11
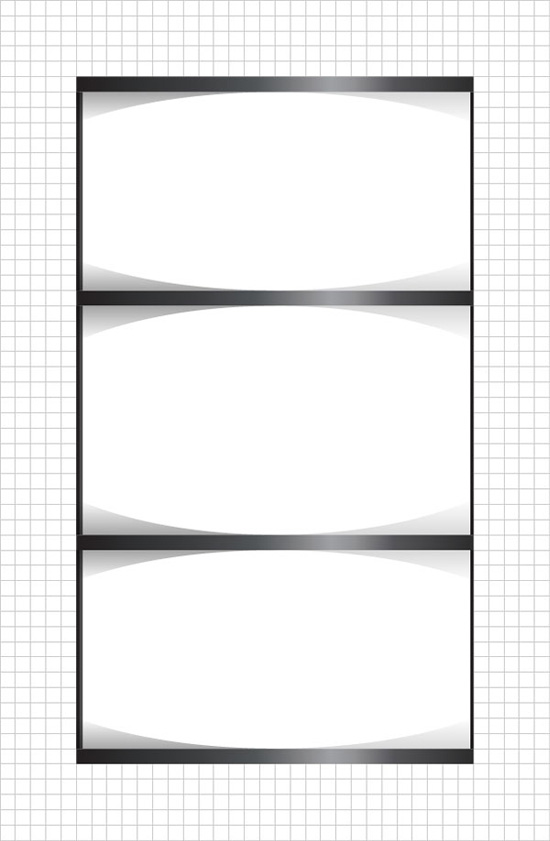
Move down to the other two white rectangles and repeat the techniques mentioned in the last three steps.
Step 12
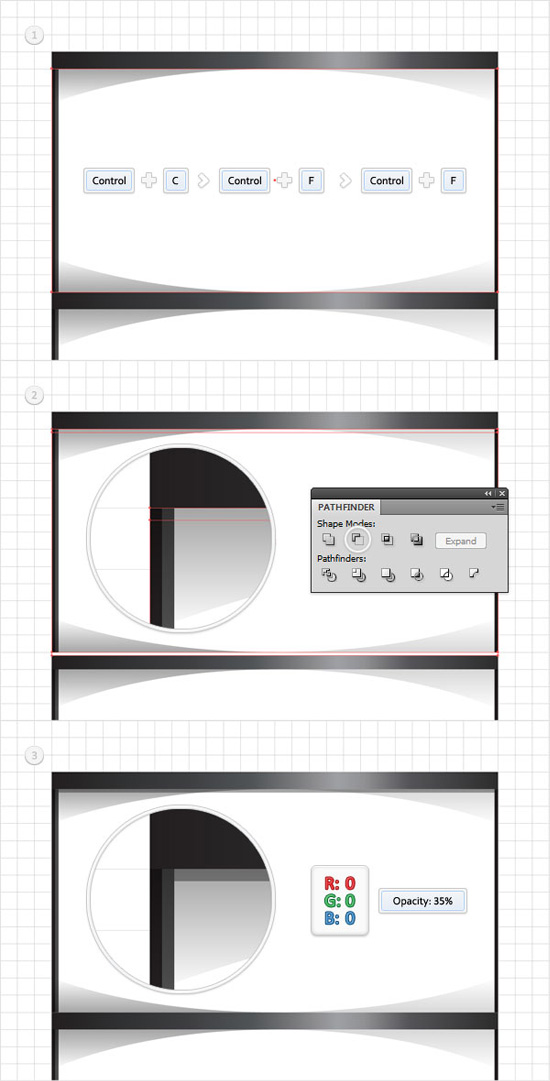
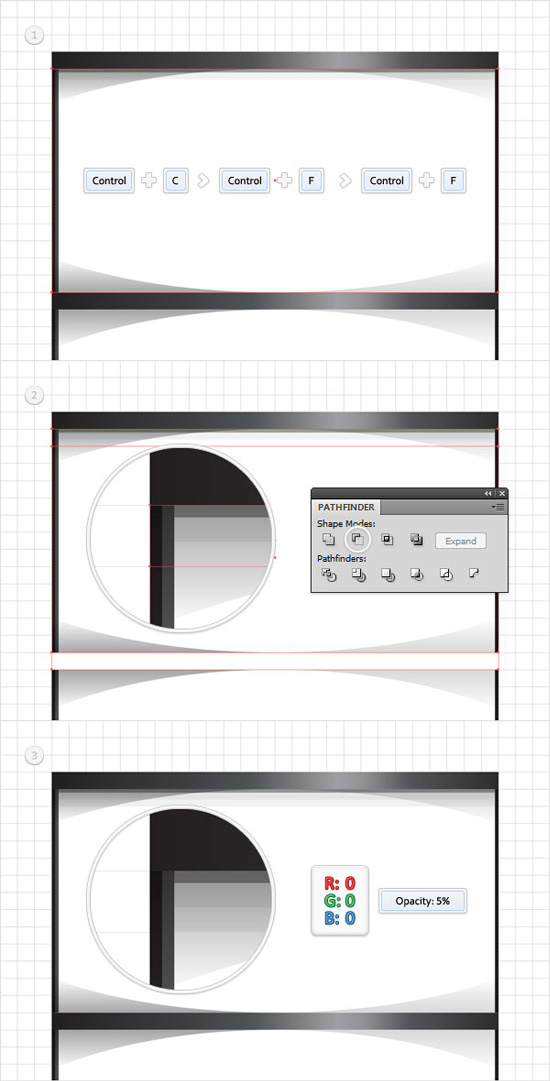
Focus on the top, white rectangle, select it and make two copies in front (Control + C > Control + F > Control + F). Select the top copy and move it 1px down. Reselect both copies and click on the Minus Front button from the Pathfinder panel. Fill the resulting with black and lower its opacity to 35%.
Step 13
Reselect the top, white rectangle and make two new copies in front (Control + C > Control + F > Control + F). Select the top copy and move it 3px down. Reselect both copies and click on the Minus Front button from the Pathfinder panel. Fill the resulting shape with black and lower its opacity to 5%.
Step 14
Reselect the top, white rectangle and make two new copies in front (Control + C > Control + F > Control + F). Select the top copy and move it 5px down. Reselect both copies and click on the Minus Front button from the Pathfinder panel. Fill the resulting shape with black and lower its opacity to 5%. y
y
Step 15
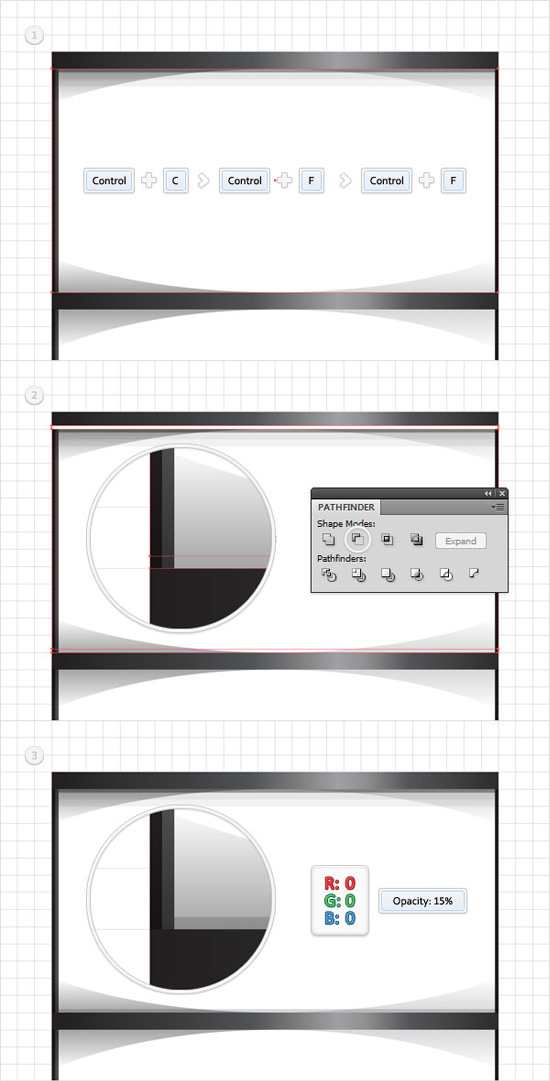
Reselect the top, white rectangle and make two new copies in front (Control + C > Control + F > Control + F). Select the top copy and move it 1px up. Reselect both copies and click on the Minus Front button from the Pathfinder panel. Fill the resulting shape with black and lower its opacity to 15%.
Step 16
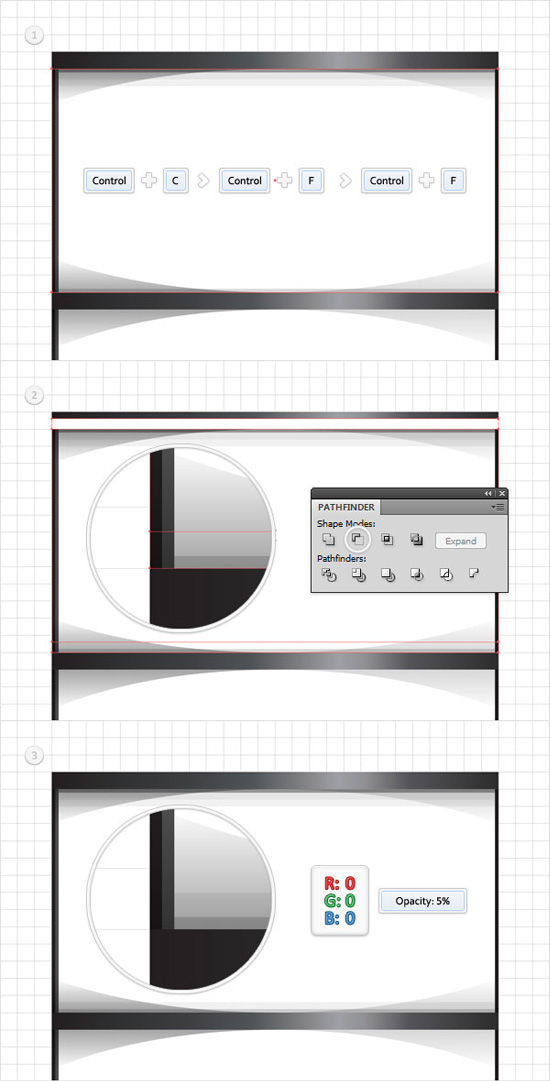
Reselect the top, white rectangle and make two new copies in front (Control + C > Control + F > Control + F). Select the top copy and move it 3px up. Reselect both copies and click on the Minus Front button from the Pathfinder panel. Fill the resulting shape with black and lower its opacity to 5%.
Step 17
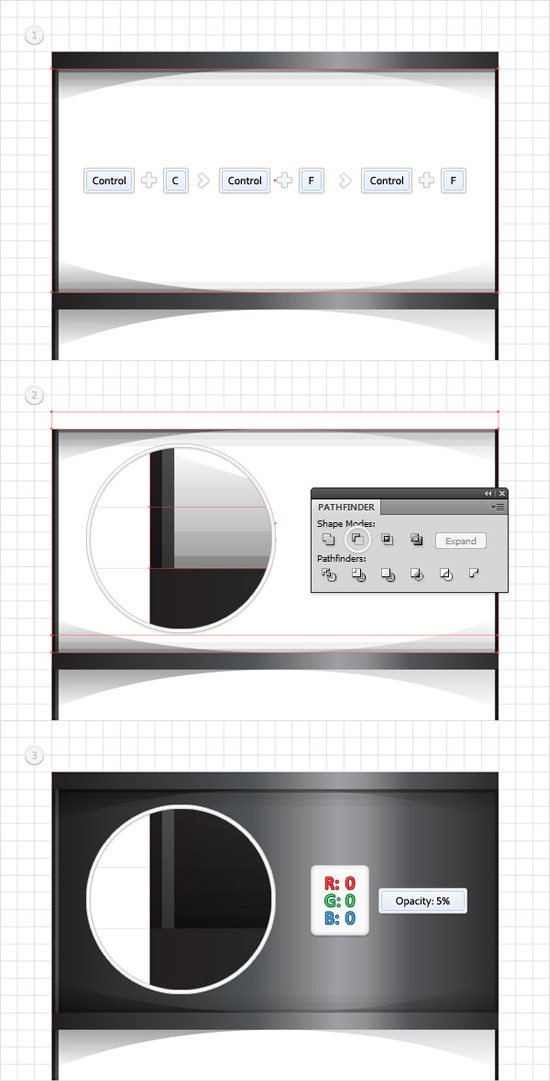
Reselect the top, white rectangle and make only one copy in front (Control + C > Control + F). Select it and move it 5px down. Select this copy along with the original white shape and click on the Minus Front button from the Pathfinder panel. Fill the resulting shape with black and lower its opacity to 5%.
Step 18
Move to the other two white rectangles and repeat the techniques mentioned in the last six steps.

Did you post the right link to page 2? The page shows A Look at Inspiring Website Designs of Musicians Page 2
and not how to complete the barrel tutorial…
The link to page 2 is wrong. Can you post the correct link?
Sorry about the mixup and inconvenience. Not sure what happened there, but the link is corrected.
Noupe Editorial Team
Really a great and easy to understand tutorial. But for me its took more than 4 hours to learn step by step tutorial as i am a new to Illustration.
Hi,
I have followed this great tutorial and finished making my own toxic barrels (“evil laughter!”). I would like to ask the authors, vforvectors, or the noupe editorial staff, if there is a link to the license page on this site. I would like to upload my work to http://www.creattor.com, where I have already uploaded a lot of stuff. I will upload the vectors in AI and EPS format, and they will be available to the world, with a free for commercial use license. So, how about it people, can I upload them, or not?
Nice one! Loved it. Learned a bit about parts of the Pathfinder tool I’ve never used before. Thanks!
Hi,
This is great tutorial.But it’s take long time to learn.Long tutorial is good for beginner not for intermediate level learner. However it is good.
this its a great tutorial, tks for sharing!!
Awesome and easy to follow tutorial! thanks for sharing :))
Great tutorial clever use of the gradients!
Thanks