Inside WordPress: An Introduction to Custom Post Types
Most people who work with WordPress have already heard of custom post types. Unfortunately, only a few web designers and bloggers know what this function actually is and how to make use of it. Custom post types are something like the icing on the cake and one of the reasons for WordPress’ popularity. Let's have a look at custom post types and see what you can do with them.

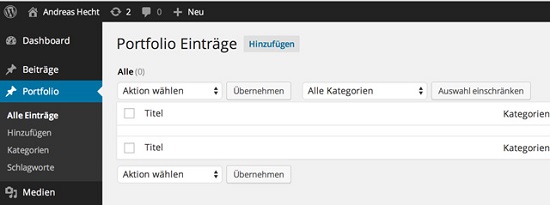 If you want to work with the portfolio, you'll need a bit more than this positive set up menu item. We'll need to create templates to display the portfolio correctly in the WordPress theme.
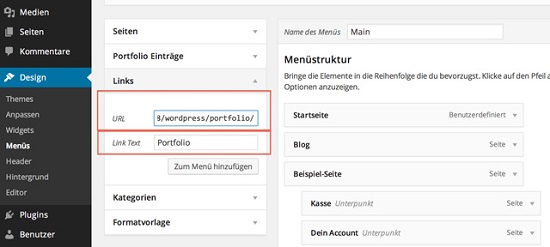
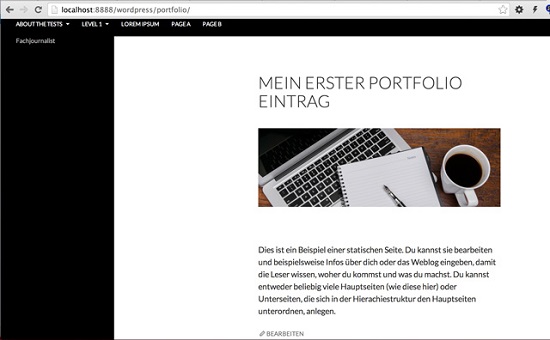 As the page “Portfolio” doesn’t physically exist (but can be called up) you should manually set up this menu item with the function “Links”.
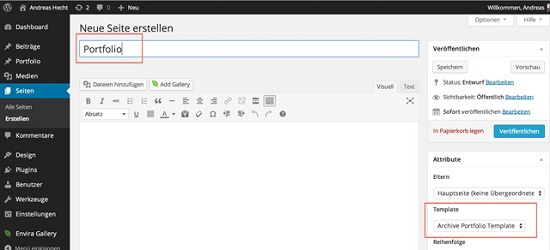
 Another method is to create a new empty page with the title Portfolio and choose the template “Archive Portfolio Template”. This generates the necessary menu item automatically:

What Are Custom Post Types?
WordPress is the most popular Content Management System in the world, with one reason being its customizability and flexibility. You can basically get up to anything you can think of, and custom post types are one way to get there. WordPress offers some post types out of the box. These are:- Post (post type: ‘post’)
- Page (post type: ‘page’)
- Attachment (post type: ‘attachment’)
- Revision (post type: ‘revision’)
- Navigation menu (post type: ‘nav_menu_item’)
Custom Taxonomies
Custom taxonomies are something like a subfunction of the custom post types. It's a mechanism to categorize custom post types and tag them with keywords. These are categories and/or tags for the WordPress custom post types. Creating custom taxonomies is really easy. We will get back to this later in the article. However, custom taxonomies are much more versatile than this article can describe. But this is something for a different article.Custom Post Types in Use
The WordPress custom post types help simplifying the creation of a functional portfolio which presents your work nicely. Let’s go through the steps:Register Custom Post Types
Add the following code at the end of the functions.php of your theme (wp-content/themes/your theme)./**
*
* Registration of our custom post type "Portfolio"
*
*/
function ah_custom_post_type() {
$labels = array(
'name' => 'Portfolio entries',
'singular_name' => 'Portfolio',
'menu_name' => 'Portfolio',
'parent_item_colon' => '',
'all_items' => 'All entries',
'view_item' => 'View entries',
'add_new_item' => 'New entry',
'add_new' => 'Add',
'edit_item' => 'Edit entry',
'update_item' => 'Update entry',
'search_items' => '',
'not_found' => '',
'not_found_in_trash' => '',
);
$rewrite = array(
'slug' => 'portfolio',
'with_front' => true,
'pages' => true,
'feeds' => true,
);
$args = array(
'labels' => $labels,
'supports' => array( 'title', 'editor', 'excerpt', 'thumbnail', 'comments', 'trackbacks', ),
'taxonomies' => array( 'category', 'post_tag' ),
'hierarchical' => false,
'public' => true,
'show_ui' => true,
'show_in_menu' => true,
'show_in_nav_menus' => true,
'show_in_admin_bar' => true,
'menu_position' => 5,
'can_export' => false,
'has_archive' => true,
'exclude_from_search' => false,
'publicly_queryable' => true,
'rewrite' => $rewrite,
'capability_type' => 'page',
);
register_post_type( 'portfolio', $args );
}
// Hook into the 'init' action
add_action( 'init', 'ah_custom_post_type', 0 );
Some Words about the Code
The topmost part until $rewrite is responsible for the extended admin menu. The middle part creates the permalink with the slug “portfolio”. The bottom part of the code defines that single parts are supported, for example, title, editor, excerpt, article picture, and comments. Your WordPress admin section now has the new menu item “Portfolio” with the submenus “Categories” and “Keywords”. If you want to work with the portfolio, you'll need a bit more than this positive set up menu item. We'll need to create templates to display the portfolio correctly in the WordPress theme.
Necessary Templates for the Custom Post Type
The WordPress template engine recognizes the templates for this post type automatically if they have the format single-posttype.php for the single post and archive-posttype.php for the summary page. Depending on how comprehensive your project is going to be, you'll need to create one or two templates. Name one single-portfolio.php and the other one archive-portfolio.php. In this example, we'll create the template archive-portfolio.php to display all portfolio entries on one page.Display Custom Post Type
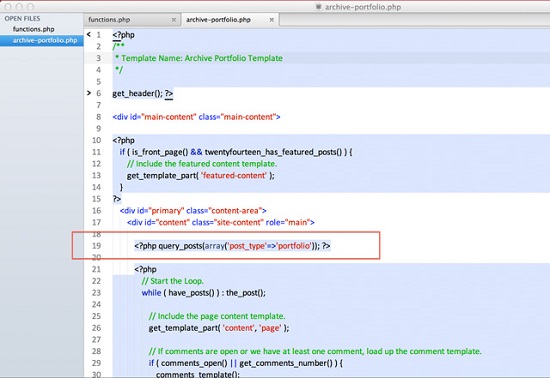
Create a new empty page with any editor, and name it archive-portfolio.php. Now, copy the content of your page.php (or the index.php) and paste it into the new template. Change then the description of the template to the following:<?php
/**
* Template Name: Archive Portfolio Template
*/
Now it's important to tell the template which type of content will be displayed. To do this, paste the following code above the loop:
<?php query_posts(array('post_type'=>'portfolio')); ?>

Important to Know
Go to the menu item “Settings => Permalinks” and save your permalinks again. If you don’t do that, you'll most likely get to see a 404 error when calling up www.your-website.com/portfolio/. After saving the permalinks, the site can be called up without problems. As the page “Portfolio” doesn’t physically exist (but can be called up) you should manually set up this menu item with the function “Links”.
 Another method is to create a new empty page with the title Portfolio and choose the template “Archive Portfolio Template”. This generates the necessary menu item automatically:


It’s a better idea to make a simple custom plugin for the Custom post types etc… If you manually create a lovely portfolio or custom database of products, you probably want to take it with you when/if you change themes.
Good article, thanks :)